Introduction
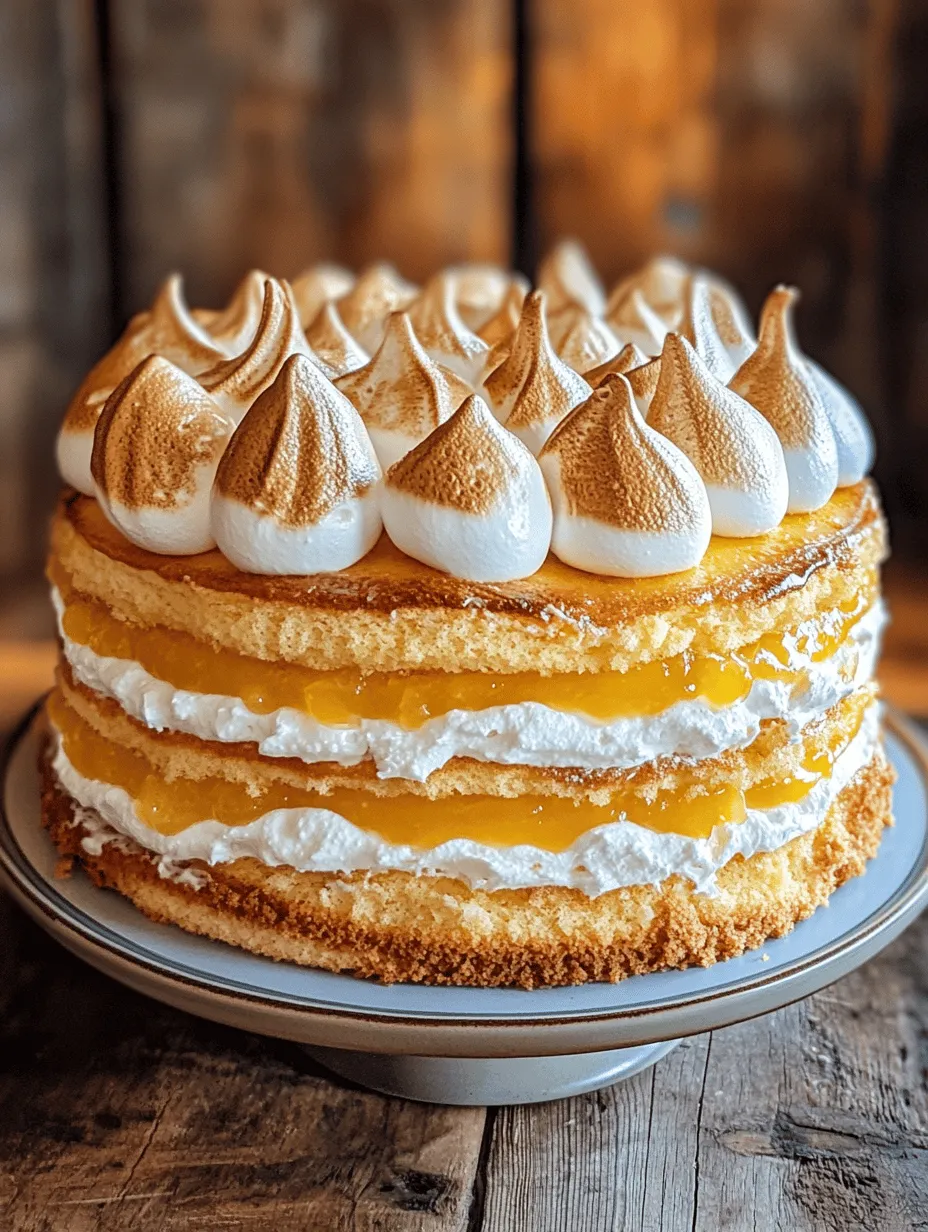
Welcome to the world of Zesty Lemon Meringue Dream Cake, a dessert that perfectly embodies the essence of sunshine and joy! This elegant cake combines the tartness of fresh lemons with the sweet, fluffy texture of meringue, creating a delightful experience for your taste buds. Lemon-flavored desserts have long been favored for their refreshing qualities, making them the ideal choice for any occasion. Whether you’re celebrating a birthday, hosting a spring gathering, or simply treating yourself on a sunny afternoon, this cake stands out as a vibrant and uplifting centerpiece.
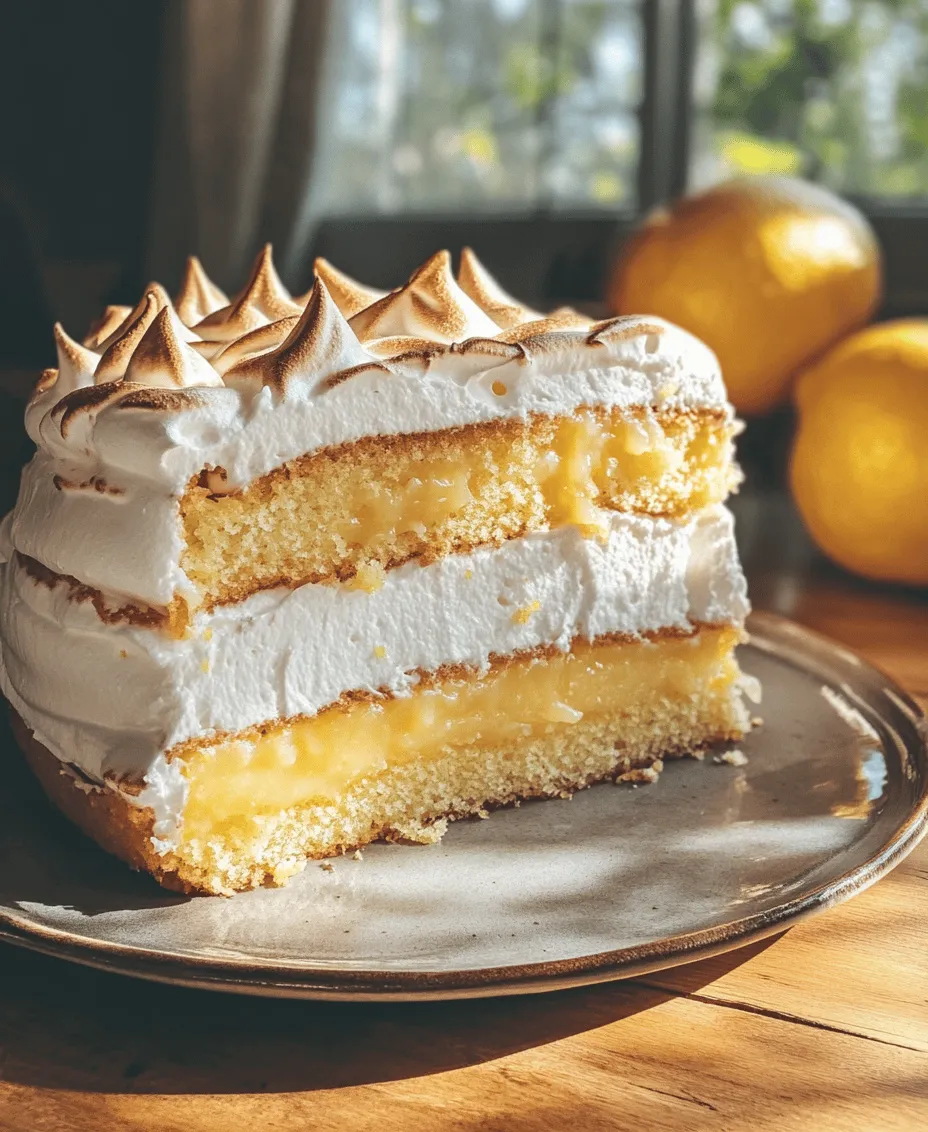
Homemade cakes, like the Zesty Lemon Meringue Dream Cake, hold a special place in our hearts and gatherings. They are not just desserts; they are memories in the making, shared with family and friends. The process of baking and the aroma that fills your kitchen as the cake rises is an experience to savor. As you slice into this cake, the layers reveal a beautiful arrangement of fluffy cake, zesty lemon curd, and a cloud-like meringue topping that is sure to impress your guests and leave them craving more.
Understanding the Components of the Cake
To fully appreciate the Zesty Lemon Meringue Dream Cake, it’s essential to understand its three main components: the light and fluffy cake, the tangy lemon curd filling, and the sweet meringue topping. Each element plays a vital role in creating a harmonious balance of flavors and textures that make this cake irresistible.
The Cake
The cake itself serves as the base, providing a soft and tender structure that holds together the vibrant filling and topping. Its light and airy texture create a delightful contrast to the rich lemon curd and the sweet meringue. When baking this cake, the quality of your ingredients matters significantly. Using high-quality all-purpose flour and fresh eggs can elevate your cake, ensuring it achieves the perfect rise and moisture balance.
The Lemon Curd Filling
Next, we have the lemon curd, which is the zesty heart of the cake. This bright and tangy filling is what truly makes the Zesty Lemon Meringue Dream Cake stand out. It provides a refreshing contrast to the sweetness of the cake and the meringue. The lemon curd is made from fresh lemon juice, sugar, eggs, and butter, and its velvety texture complements the fluffy layers of the cake beautifully.
The Meringue Topping
Finally, the meringue topping crowns the cake, adding a light and sweet finish. This airy layer is made from whipped egg whites and sugar, creating a beautiful glossy finish that can be toasted for an added depth of flavor. The meringue not only enhances the aesthetic appeal of the cake but also adds another layer of texture that rounds out the overall experience.
With a clear understanding of these components, you’re ready to embark on the journey of creating this delightful cake. Each step is crucial, and attention to detail will ensure that your Zesty Lemon Meringue Dream Cake becomes a showstopper at any gathering.
The Cake: A Light and Fluffy Base
Texture and Flavor Profile
The cake base of the Zesty Lemon Meringue Dream Cake is light, fluffy, and incredibly flavorful. Its subtle sweetness pairs perfectly with the tangy lemon curd and the airy meringue, creating a delightful balance that appeals to all palates. The texture is crucial; it should be moist and tender, easily yielding to a fork while still holding its structure when layered with the curd and meringue.
Ingredient Roles
To achieve this perfect cake, understanding the role of each ingredient in the batter is essential:
– All-Purpose Flour: This is the foundation of your cake. It provides the necessary structure, allowing the cake to rise while maintaining a soft crumb.
– Baking Powder: As a leavening agent, baking powder is crucial for achieving a light and fluffy texture. It releases carbon dioxide when activated, helping the cake to rise.
– Sugar: Not only does sugar sweeten the cake, but it also contributes to moisture retention, resulting in a tender crumb.
– Butter: The fat in butter adds richness and enhances the overall flavor of the cake. It also helps to create a soft texture when creamed with sugar.
– Eggs: Eggs provide structure and stability to the cake. They also contribute moisture and richness, enhancing the flavor profile.
– Milk: Adding milk to the batter helps to achieve the desired consistency, making it easy to pour into the cake pans while adding a touch of creaminess.
Step-by-Step Instructions for Cake Batter
Now, let’s dive into the process of preparing the cake batter. Follow these steps to ensure your cake turns out perfectly:
1. Preheat the Oven: Start by preheating your oven to 350°F (175°C). This ensures that the cake cooks evenly and rises properly.
2. Prepare Your Cake Pans: Grease and flour two 9-inch round cake pans. This will prevent the cake from sticking and make it easier to remove once baked.
3. Cream Butter and Sugar: In a large mixing bowl, use an electric mixer to cream together 1 cup of unsalted butter and 1 ½ cups of granulated sugar until the mixture is light and fluffy. This typically takes about 3-5 minutes. Be sure to scrape down the sides of the bowl to ensure all ingredients are well combined.
4. Add Eggs: Gradually add in 4 large eggs, one at a time, beating well after each addition. This step is crucial as it incorporates air into the batter, contributing to the fluffiness of the cake.
5. Incorporate Dry Ingredients: In a separate bowl, whisk together 2 ½ cups of all-purpose flour, 1 tablespoon of baking powder, and a pinch of salt. Gradually add this dry mixture to the creamed butter and sugar, alternating with 1 cup of milk. Begin and end with the flour mixture, mixing just until combined. Over-mixing can lead to a dense cake, so be careful not to overdo it.
6. Flavor It Up: Add the zest of 2 lemons and 1 teaspoon of pure vanilla extract to the batter, mixing gently to distribute the flavors throughout.
7. Pour and Bake: Divide the batter evenly between the two prepared cake pans. Smooth the tops with a spatula and place them in the preheated oven. Bake for 25-30 minutes, or until a toothpick inserted into the center comes out clean.
8. Cooling: Once baked, allow the cakes to cool in the pans for about 10 minutes. Then, carefully remove them from the pans and transfer them to a wire rack to cool completely before assembling.
Tips for Achieving the Perfect Cake Layers
– Room Temperature Ingredients: Ensure that your butter, eggs, and milk are at room temperature. This allows for better emulsification and results in a smoother batter.
– Sift Your Flour: If you have time, sift the flour before measuring. This helps to aerate the flour and can lead to a lighter cake.
– Don’t Open the Oven Door: Avoid opening the oven door during the first half of the baking time. This can cause the cake to collapse due to sudden temperature changes.
– Test for Doneness: Use a toothpick or cake tester to check for doneness. If it comes out clean or with a few moist crumbs, the cake is done.
Lemon Curd Filling: The Zesty Heart
The Importance of Lemon Curd
The lemon curd filling is what makes the Zesty Lemon Meringue Dream Cake truly special. Its bright, tangy flavor provides a refreshing contrast to the sweet cake and the meringue topping. This luscious filling not only enhances the overall flavor but also adds a beautiful color and a creamy texture that complements the fluffy cake layers.
Ingredients for Lemon Curd
To make the perfect lemon curd, you’ll need the following ingredients:
– Fresh Lemons: For the best flavor, use fresh lemons. The zest and juice are both essential components that contribute to the curd’s brightness.
– Eggs: Whole eggs and additional egg yolks help to thicken the curd while adding richness.
– Granulated Sugar: Sugar balances the tartness of the lemons and provides sweetness.
– Butter: Unsalted butter adds a luxurious texture and richness to the curd, making it velvety smooth.
Fresh Lemon Juice vs. Bottled Lemon Juice
When it comes to making lemon curd, using fresh lemon juice is highly recommended. Freshly squeezed juice has a vibrant flavor that bottled lemon juice simply cannot replicate. The acidity of fresh lemon juice also plays a role in the thickening process, resulting in a more flavorful and authentic lemon curd.
The Role of Eggs and Sugar
Eggs are the backbone of lemon curd, providing structure and stability. The proteins in the eggs coagulate as the curd cooks, creating a thick and creamy texture. Sugar, on the other hand, sweetens the curd and balances the tartness of the lemons, ensuring a delightful flavor profile.
Step-by-Step Instructions for Making Lemon Curd
Follow these steps to make your lemon curd filling:
1. Prepare Ingredients: Begin by zesting and juicing 4-5 large lemons. You’ll need about 1 cup of fresh lemon juice for the curd.
2. Combine Ingredients: In a medium saucepan, whisk together the lemon juice, lemon zest, 1 cup of granulated sugar, 4 large eggs, and 2 egg yolks until well combined.
3. Cook Over Low Heat: Place the saucepan over low heat and cook the mixture, stirring constantly with a wooden spoon or a silicone spatula. It’s important to keep the heat low to prevent the eggs from scrambling.
4. Thicken the Curd: Continue to cook the curd until it thickens and coats the back of the spoon, about 10-15 minutes. You’ll know it’s ready when you can draw a line through the curd on the back of the spoon, and it holds its shape.
5. Add Butter: Once thickened, remove the saucepan from the heat and stir in ½ cup of unsalted butter, cut into small pieces. Stir until the butter is completely melted and the curd is smooth.
6. Strain (Optional): If you prefer a silky-smooth curd, strain it through a fine-mesh sieve to remove any lumps or bits of cooked egg. This step is optional but recommended for a refined texture.
7. Cool and Store: Allow the lemon curd to cool to room temperature, then transfer it to a clean jar. Refrigerate for up to one week, or use it immediately to layer between the cake.
With this detailed guide, you are well on your way to creating the Zesty Lemon Meringue Dream Cake, from its fluffy base to the vibrant lemon curd that elevates each slice. Stay tuned for the next part, where we will delve into the meringue topping and the final assembly of this stunning dessert!
Tips for Ensuring a Smooth and Creamy Texture
Achieving a smooth and creamy texture in your Zesty Lemon Meringue Dream Cake requires attention to detail, particularly when preparing the lemon curd and meringue layers. Here are some essential tips to ensure that your cake has that delightful, velvety mouthfeel:
1. Use Fresh Ingredients: Fresh eggs and quality butter can significantly enhance the creaminess of your lemon curd. Fresh lemon juice, preferably from organic lemons, will also add a bright and zesty flavor that elevates the entire cake.
2. Strain the Lemon Curd: After cooking your lemon curd, strain it through a fine mesh sieve. This removes any cooked egg bits and results in a smoother texture.
3. Cool Gradually: Allow the lemon curd to cool slowly at room temperature before refrigerating it. This gradual cooling helps to maintain its creamy consistency.
4. Whip the Cream Correctly: If you choose to incorporate whipped cream into your meringue for added richness, ensure it is whipped to soft peaks first before folding it into the meringue. This prevents the meringue from becoming too dense.
Meringue Topping: The Sweet Cloud
The meringue serves as the crowning glory of the Zesty Lemon Meringue Dream Cake, providing a light and airy contrast to the dense lemon curd and moist cake layers. Not only does it enhance the cake’s visual appeal, but it also adds a delightful sweetness that balances the tartness of the lemon.
The Science Behind Meringue
Understanding the science of meringue is crucial for achieving the perfect texture. Meringue can be categorized into two main types based on how it is whipped:
– Soft Peaks: When you whip egg whites until they form soft peaks, the mixture is glossy and holds a shape but will droop when lifted with a whisk. Soft peaks are ideal for folding into other mixtures, such as cakes or soufflés.
– Stiff Peaks: Whipping the egg whites further until they reach stiff peaks results in a drier and more stable meringue. Stiff peaks stand tall and do not droop when lifted. This type of meringue is perfect for topping your cake.
Meringue Ingredients and Their Functions
The basic ingredients for meringue include:
– Egg Whites: The primary component, providing structure and volume.
– Granulated Sugar: Stabilizes the egg whites and sweetens the meringue.
– Cream of Tartar: A stabilizer that helps the meringue maintain its shape and volume.
– Vanilla Extract: Adds flavor to the meringue, enhancing its sweetness.
Step-by-Step Guide to Whipping Meringue to Perfection
1. Prepare Your Equipment: Ensure that your mixing bowl and whisk are clean and free from grease. Any residue can prevent the egg whites from whipping properly.
2. Separate the Eggs: Carefully separate the egg whites from the yolks, making sure no yolk gets into the whites. This can compromise the whipping process.
3. Add Cream of Tartar: Begin whipping the egg whites on medium speed until they become frothy. Add a pinch of cream of tartar to help stabilize the mixture.
4. Gradually Add Sugar: Once frothy, gradually add in the granulated sugar, one tablespoon at a time. This allows the sugar to dissolve completely and helps achieve a stable meringue.
5. Whip to Stiff Peaks: Increase the mixer speed to high and continue whipping until stiff peaks form. This should take about 5-10 minutes.
6. Incorporate Vanilla: Gently fold in the vanilla extract after reaching stiff peaks.
Tips for Achieving the Ideal Meringue Texture
– Room Temperature Egg Whites: Use egg whites that are at room temperature as they whip better than cold ones.
– Avoid Overwhipping: Whipping beyond stiff peaks can lead to a dry and grainy texture. Stop whipping as soon as you see stiff peaks.
– Prevent Weeping: To avoid weeping, or the liquid that can form at the base of the meringue, ensure the meringue is spread immediately onto the lemon curd and baked promptly.
Assembly of the Zesty Lemon Meringue Dream Cake
With your lemon curd and meringue prepared, it’s time to assemble your cake. Proper assembly is crucial for a visually appealing and delicious final product.
Layering the Cake with Lemon Curd
1. Level the Cake Layers: Once your cake layers have cooled completely, level them with a serrated knife to ensure even stacking.
2. Spread the Lemon Curd: Place one layer of cake on a serving plate. Spread a generous amount of lemon curd evenly over the top, ensuring it reaches the edges.
3. Add the Second Layer: Gently place the second cake layer on top of the lemon curd, pressing down slightly to ensure it adheres.
4. Top with More Lemon Curd: Spread another layer of lemon curd on top of the second cake layer, ensuring a thick, zesty layer that will complement the meringue.
Spreading the Meringue and Creating Decorative Peaks
1. Add Meringue: Spoon the whipped meringue onto the top of the cake, starting from the center and spreading it outward. Use a spatula to create swirls and peaks for a decorative finish.
2. Create Texture: For added visual appeal, use the back of a spoon or a spatula to create peaks and swirls in the meringue. This will enhance the cake’s presentation.
3. Assemble Carefully: Ensure that the meringue completely covers the lemon curd to prevent it from drying out.
Importance of Proper Assembly for Visual Appeal and Taste Balance
Proper assembly not only contributes to the cake’s overall aesthetics but also ensures each slice offers a perfect balance of flavors and textures. The layers should be distinct yet harmonious, with each bite revealing the luscious lemon curd, moist cake, and airy meringue.
Toasting the Meringue: Achieving the Perfect Finish
Toasting the meringue is a crucial step that adds depth to the flavor and enhances the overall presentation of your Zesty Lemon Meringue Dream Cake.
The Toasting Process and Its Significance
Toasting the meringue creates a beautiful golden-brown exterior, adding a slight crunch and depth of flavor to the sweet, fluffy interior. This contrast in textures makes each bite a delightful experience.
Tips for Monitoring the Meringue to Prevent Burning
1. Use a Kitchen Torch: A culinary torch provides precise control over the toasting process. Hold the torch about 2-3 inches away from the meringue and move it in a circular motion to achieve an even toast.
2. Oven Broiling: If you don’t have a torch, you can place the assembled cake under a broiler for a few minutes. Watch closely, as meringue can quickly transition from perfectly toasted to burnt.
3. Rotate for Even Browning: If using the oven method, rotate the cake halfway through to ensure even browning on all sides.
Description of the Final Presentation and Serving Suggestions
Once your meringue is toasted to perfection, your Zesty Lemon Meringue Dream Cake will boast a stunning visual contrast of the bright lemon curd, fluffy meringue, and moist cake layers. Serve it on a beautiful platter, garnished with lemon slices or zest for added appeal.
Serving and Enjoying the Cake
To enjoy your Zesty Lemon Meringue Dream Cake to the fullest, consider the following serving suggestions:
1. Temperature: Serve the cake chilled, allowing the lemon curd to firm up slightly for a cleaner slice. The meringue can be toasted right before serving to maintain its texture.
2. Accompaniments: Pair the cake with a dollop of whipped cream, a scoop of vanilla ice cream, or fresh berries to enhance the overall flavor profile.
3. Occasions: This cake is perfect for various occasions such as birthdays, holidays, and gatherings. Its bright flavors and impressive presentation make it a showstopper at any dessert table.
4. Flavor Profile and Texture Experience: Each bite of this cake offers a delightful journey through layers of tart lemon curd, fluffy meringue, and moist cake, creating a symphony of flavors and textures that dance on your palate.
Conclusion
The Zesty Lemon Meringue Dream Cake is a beautiful and delicious dessert that combines the tangy brightness of lemon curd with the airy sweetness of meringue, all layered between moist cake. Each component of this recipe harmonizes perfectly, creating a delightful experience for anyone lucky enough to enjoy a slice.
Baking is not just about creating desserts; it’s about sharing joy, love, and creativity with others. This cake is a testament to that joy, inviting you to indulge in the pleasure of homemade desserts. We encourage you to try this recipe and explore variations that suit your personal tastes, whether you decide to play with different citrus flavors or add a hint of spice. Happy baking!
