Introduction
As the leaves begin to turn and a crisp chill fills the air, the culinary world shifts its focus to the warm, comforting flavors of fall. Among the seasonal favorites, pumpkin-based desserts emerge as stars in our kitchens, offering a delightful blend of nostalgia and innovation. One such treat that captures the essence of autumn is the Pumpkin Paradise Cookie. These cookies are not only a celebration of pumpkin’s rich flavor but also a harmonious blend of spices that evokes warmth and comfort.
What sets Pumpkin Paradise Cookies apart is their unique texture and flavor profile. The use of pumpkin puree lends a moistness that is hard to resist, while the warm spices create a symphony of taste that dances on the palate. Perfectly spiced and irresistibly soft, these cookies are ideal for fall gatherings, festive holiday parties, or even a cozy night in with a cup of tea. Whether you’re looking to impress guests or satisfy your own sweet tooth, these cookies are sure to become a cherished addition to your seasonal baking repertoire.
The Allure of Pumpkin in Baking
Pumpkin has a long-standing history in culinary traditions, especially in North America, where it has been a staple ingredient in both savory and sweet dishes. From classic pumpkin pies to hearty soups, the versatility of this gourd knows no bounds. Its popularity surged in the early 19th century, coinciding with the advent of Thanksgiving as a major holiday. Over time, pumpkin has transcended its traditional roles, finding its way into an array of baked goods, including muffins, breads, and, of course, cookies.
Beyond its rich flavor, pumpkin puree is packed with nutritional benefits. It is an excellent source of vitamin A, which supports vision and immune function, and is rich in antioxidants that contribute to overall health. Moreover, pumpkin is low in calories, making it an appealing ingredient for those looking to indulge without guilt. The puree’s natural sweetness means that less sugar is often required in recipes, allowing the pumpkin flavor to shine through beautifully.
One of the reasons pumpkin pairs so wonderfully with warm spices in baking is its ability to complement and enhance those flavors. Spices like cinnamon, nutmeg, and ginger add depth and warmth, creating an inviting aroma that fills the kitchen as cookies bake. This perfect marriage of flavors not only satisfies the palate but also evokes memories of cozy autumn evenings spent with loved ones.
Ingredients Breakdown
Pumpkin Puree
At the heart of Pumpkin Paradise Cookies is, of course, pumpkin puree. This ingredient is essential for imparting moisture and a subtle sweetness to the cookies. Using canned pumpkin puree is both convenient and consistent, ensuring that your cookies turn out perfect every time. When selecting pumpkin puree, look for 100% pure pumpkin with no added sugars or spices for the best results. The moisture content in pumpkin helps create a soft, chewy texture, setting these cookies apart from your average baked treat.
All-Purpose Flour
All-purpose flour serves as the backbone of any cookie recipe, and Pumpkin Paradise Cookies are no exception. Its role is crucial, as it provides structure and stability to the cookies. The right flour-to-pumpkin ratio is essential for achieving the desired consistency. Too much flour can lead to a dry cookie, while too little can result in an overly wet batter. For the best results, use a kitchen scale to measure your flour, or spoon it into your measuring cup and level it off to avoid packing it down.
Spices
The warm spice blend is one of the most delightful aspects of Pumpkin Paradise Cookies. A combination of cinnamon, nutmeg, ginger, and allspice creates a rich, aromatic flavor profile that complements the pumpkin beautifully.
– Cinnamon brings a warm sweetness and is a quintessential fall spice.
– Nutmeg adds a slightly nutty, aromatic quality that enhances the cookie’s depth.
– Ginger provides a zesty kick, balancing the sweetness with its warm, spiced undertones.
– Allspice rounds out the blend with a hint of clove and peppery notes, adding complexity to the overall flavor.
Combining these spices not only enhances the taste but also fills your kitchen with a wonderful aroma that signals the arrival of fall.
Sugars
In this recipe, a combination of granulated and brown sugar is used to achieve the perfect balance of texture and taste. Granulated sugar contributes to the cookies’ spread and crisp edges, while brown sugar adds moisture and a rich caramel flavor, resulting in chewier cookies. The molasses in brown sugar also complements the warm spices, enhancing the overall flavor profile. For an added depth, consider using dark brown sugar, which contains more molasses than light brown sugar.
Butter
Unsalted butter is the fat of choice for these cookies, playing a crucial role in flavor and texture. Butter adds richness and helps create a tender crumb when creamed with sugars. Using unsalted butter allows you to control the amount of salt in your recipe, which is particularly important when balancing the sweetness of the sugars and the warmth of the spices.
Egg and Vanilla
Eggs are vital in cookie recipes as they provide moisture, structure, and richness. In Pumpkin Paradise Cookies, the egg helps bind the ingredients together while contributing to the soft texture. Vanilla extract adds a layer of flavor that rounds out the sweetness and enhances the overall taste of the cookies. Using high-quality vanilla extract can elevate your cookies, making them even more scrumptious.
Tools Required for Baking Cookies
To successfully bake your Pumpkin Paradise Cookies, having the right tools is essential. Here’s a list of the essential baking tools you’ll need for this recipe:
– Mixing Bowls: Both medium and large mixing bowls are necessary for combining the dry and wet ingredients.
– Whisk and Electric Mixer: A whisk is great for combining dry ingredients, while an electric mixer is ideal for creaming the butter and sugars, ensuring a light and fluffy texture.
– Cookie Scoop: Using a cookie scoop ensures uniform cookie sizes, which helps them bake evenly. This tool is especially useful for maintaining consistency in your cookie dough portions.
– Baking Sheet and Parchment Paper: A baking sheet lined with parchment paper provides a non-stick surface for the cookies, preventing them from sticking and ensuring easy cleanup. It also helps with even baking, resulting in perfectly golden-brown cookies.
With the right ingredients and tools at your disposal, you’re ready to embark on the delightful journey of baking Pumpkin Paradise Cookies. These cookies promise to bring the warmth and flavor of autumn into your home, making them a must-try for anyone looking to celebrate the season with a delicious treat.
Step-by-Step Instructions for Pumpkin Paradise Cookies
Creating the perfect batch of Pumpkin Paradise Cookies requires attention to detail at every stage. Follow this comprehensive guide to ensure your cookies turn out deliciously every time.
Prepping the Oven and Baking Sheet
Before you begin mixing your ingredients, it’s essential to prepare your oven and baking sheet. Preheat your oven to 350°F (175°C). This step is crucial as it ensures that your cookies bake evenly and achieve the perfect texture. While the oven is warming up, line your baking sheets with parchment paper. This will prevent the cookies from sticking and make cleanup a breeze. If you don’t have parchment paper, greasing the baking sheet lightly with cooking spray will also work.
Mixing Dry Ingredients
In a medium bowl, combine the dry ingredients: all-purpose flour, baking soda, baking powder, salt, and ground spices like cinnamon, nutmeg, and ginger. Whisk the mixture thoroughly until it is well combined and aerated. This step is significant because it helps to evenly distribute the leavening agents and spices throughout the flour, which is vital for achieving uniform flavor and texture in your cookies. Set this bowl aside while you move on to the next step.
Creaming Butter and Sugars
In a large mixing bowl, use an electric mixer to cream together your softened unsalted butter, granulated sugar, and brown sugar. Beat the mixture on medium speed until it becomes light and fluffy, which usually takes about 2 to 3 minutes. The creaming process incorporates air into the mixture, which contributes to the cookies’ chewy texture. Make sure to scrape down the sides of the bowl occasionally to ensure even mixing.
Incorporating Pumpkin Mixture
Next, add the canned pumpkin puree and vanilla extract to your creamed butter and sugars. Mix on low speed until just combined. It’s important not to overwork the dough at this stage, as doing so can lead to tough cookies. Overmixing can also incorporate too much air, affecting the density of the final product. Gently fold in the dry ingredients you prepared earlier, mixing until you no longer see any streaks of flour. The dough should be thick and slightly sticky.
Forming Cookies
Using a cookie scoop or a tablespoon, portion out the dough onto the prepared baking sheets. Leave about 2 inches of space between each scoop to allow the cookies to spread while baking. If you want larger cookies, feel free to use a bigger scoop; just keep in mind that this may alter the baking time slightly. Aim for uniform sizes to ensure even baking.
Baking Process
Once your cookies are formed, place them in the preheated oven. Bake for 10 to 12 minutes, or until the edges are set and the centers look slightly underbaked. The cookies will continue to firm up as they cool, so it’s better to err on the side of underbaking. Look for a golden-brown color around the edges and a soft, puffy center. Once baked, remove the cookies from the oven and let them cool on the baking sheets for about 5 minutes before transferring them to a wire rack.
Cooling Tips
Proper cooling is crucial for maintaining the texture and flavor of your cookies. Transfer the cookies to a wire cooling rack to allow air to circulate around them. This will help prevent them from becoming soggy and will ensure they maintain their delightful chewiness. Let the cookies cool completely before frosting or storing.
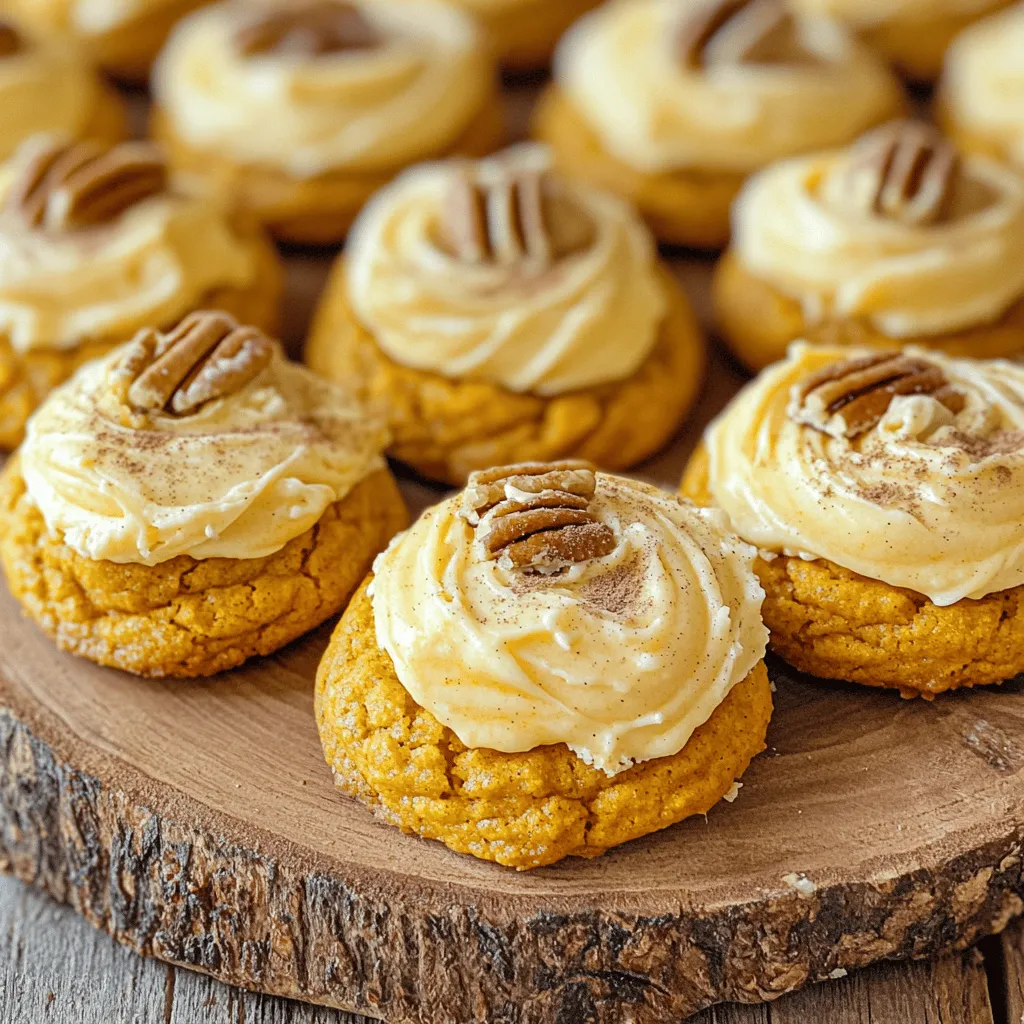
Creating the Brown Butter Frosting
A rich, nutty brown butter frosting elevates Pumpkin Paradise Cookies to a whole new level. Here’s how to make it perfectly.
Explanation of the Browning Process
To achieve that signature nutty flavor, begin by browning your butter. In a small saucepan, melt the butter over medium heat. Continue cooking, swirling the pan occasionally, until the butter turns a deep golden brown and develops a toasty aroma. This process typically takes 5 to 7 minutes. Be vigilant, as the butter can quickly go from browned to burnt. Once browned, remove it from the heat and let it cool slightly.
Techniques for Mixing Frosting to a Smooth Consistency
In a mixing bowl, combine the browned butter with powdered sugar, vanilla extract, and a splash of milk. Use an electric mixer on low speed to combine the ingredients until you achieve a smooth, spreadable consistency. If the frosting is too thick, add more milk a teaspoon at a time until it reaches your desired texture.
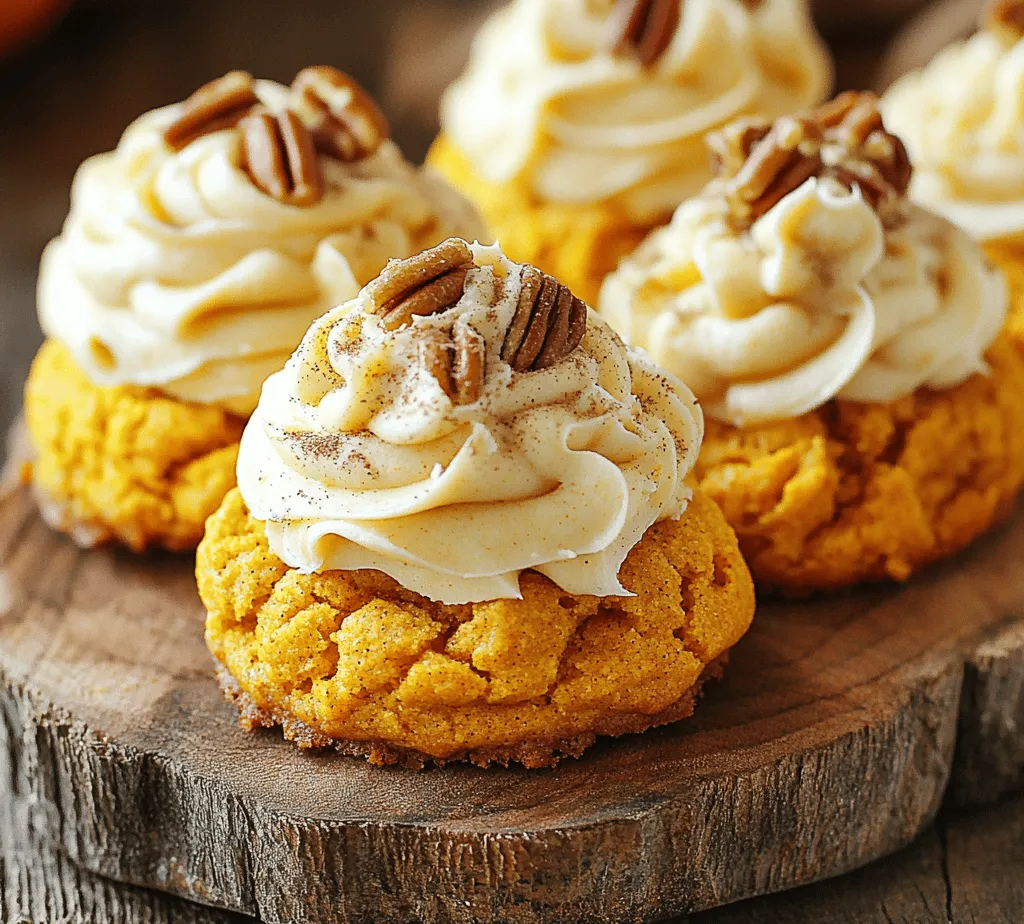
Tips for Spreading or Piping Frosting Effectively on Cookies
You can use a knife or spatula to spread the frosting onto the cooled cookies for a rustic look. If you prefer a more polished presentation, transfer the frosting to a piping bag fitted with a decorative tip and pipe the frosting onto the cookies. This adds a touch of elegance and allows for creative designs. Consider sprinkling a bit of cinnamon or chopped pecans on top for added flavor and visual appeal.
Presentation Ideas for Pumpkin Paradise Cookies
The way you present your Pumpkin Paradise Cookies can make them even more inviting. Here are some creative ideas to enhance their visual appeal.
Suggestions for Serving and Displaying Cookies Attractively
Arrange your cookies on a festive platter or cake stand to draw attention. For an autumn ambiance, consider adding decorative elements like small pumpkins or colorful leaves around the cookies. This not only enhances the presentation but also ties in with the seasonal theme.
Creative Garnishing Ideas
For a delightful finishing touch, sprinkle a little cinnamon or powdered sugar over the frosted cookies. You can also add candied pecans or crushed walnuts on top of the frosting for added texture and flavor. These garnishes not only look beautiful but also elevate the taste profile of the cookies.
Importance of Presentation in Enhancing the Festive Appeal of Cookies
A well-presented plate of cookies can be the highlight of any gathering, especially during the fall season. Whether you’re serving them at a family gathering, a potluck, or simply enjoying them at home, thoughtful presentation can enhance the overall experience and make your treats more memorable.
Storage and Shelf Life
Proper storage is essential for keeping your Pumpkin Paradise Cookies fresh and delicious.
Best Practices for Storing Cookies
To maintain freshness, store your cookies in an airtight container at room temperature. If you have a large batch, consider placing parchment paper between layers of cookies to prevent them from sticking together. For longer shelf life, you can refrigerate the cookies, but be mindful that refrigeration can alter their texture slightly, making them a bit denser.
Discussion on the Shelf Life of Cookies
When stored properly, Pumpkin Paradise Cookies can last for up to one week at room temperature. If you want to extend their shelf life, consider freezing them. For freezing, wrap each cookie individually in plastic wrap and place them in a freezer-safe bag or container. They can be frozen for up to three months. When you’re ready to enjoy them, simply thaw at room temperature.
Conclusion
Pumpkin Paradise Cookies are a delightful treat that embodies the warm flavors of autumn. With their soft, chewy texture complemented by a rich brown butter frosting, these cookies are sure to be a hit at any gathering. The joy of baking and sharing these cookies with friends and family is truly unmatched. Embrace the seasonal flavors and enjoy the baking experience, creating lasting memories with every batch. Whether you’re enjoying them with a cup of coffee or giving them as gifts, these cookies will undoubtedly bring warmth and cheer to your home. Happy baking!