
Introduction
There’s something undeniably delightful about the combination of chocolate and peanut butter. These two classic flavors meld together to create a taste sensation that pleases the palate and satisfies the sweet tooth. Among the many ways to enjoy this irresistible duo, thumbprint cookies stand out as a charming treat, perfect for any occasion—from holiday gatherings to casual afternoon snacks. The beauty of homemade cookies lies not only in their deliciousness but also in the joy of baking them.
Making your own chocolate peanut butter thumbprint cookies can be an incredibly rewarding experience, allowing you to customize flavors and ingredients while filling your kitchen with the warm, inviting aroma of freshly baked goods. This particular recipe is accessible to bakers of all skill levels, making it an ideal choice whether you’re an experienced pastry chef or a novice in the kitchen. With just a few simple steps and common pantry ingredients, you can create a batch of delectable cookies that will impress family and friends alike.
In this article, we will delve into the essentials of crafting these delightful thumbprint cookies, focusing on understanding the ingredients that contribute to their rich flavors and satisfying texture. Following that, we will provide a detailed, step-by-step guide to ensure that your baking experience is both enjoyable and successful.
Understanding the Ingredients
To create the perfect chocolate peanut butter thumbprint cookies, it’s essential to understand the role of each ingredient involved in the recipe. Each component contributes not only to the flavor of the cookies but also to their overall texture and structure.
Creamy Peanut Butter
Peanut butter is the star ingredient in this recipe, providing the rich, nutty flavor that pairs so beautifully with chocolate. While there are various types of peanut butter available—ranging from crunchy to natural—the creamy variety is preferred for this cookie recipe. Creamy peanut butter offers a smooth consistency that blends seamlessly into the dough, ensuring that each bite is filled with the unmistakable taste of peanuts without the distraction of crunchy bits. Furthermore, creamy peanut butter helps create a tender cookie texture, making it easier to achieve that melt-in-your-mouth quality.
Sugars
The balance of sugars in this recipe is crucial for achieving the desired flavor and texture. Granulated sugar provides sweetness and contributes to the cookie’s structure, while brown sugar adds moisture and a hint of caramel flavor. The combination of these two sugars creates a cookie that is both chewy and soft, with a rich depth of flavor. The slight acidity of brown sugar also reacts with the baking soda, helping to create a light, airy texture. Understanding how these sugars interact will set the stage for perfect cookies every time.
Egg
The egg plays a vital role in binding the ingredients together, contributing to the overall structure of the cookies. It adds moisture and richness, ensuring that the cookies remain soft and chewy rather than dry or crumbly. When the egg is incorporated into the dough, it helps create a cohesive mixture that holds its shape during baking, resulting in uniform cookies that retain their delightful thumbprint form.
Vanilla Extract
Vanilla extract is a key ingredient that often goes overlooked in many recipes, but its importance cannot be overstated. In chocolate peanut butter thumbprint cookies, vanilla enhances the overall flavor profile, rounding out the sweetness and providing a warm, aromatic base note. Using high-quality vanilla extract can elevate the taste of your cookies, making them even more enjoyable.
Baking Soda and Salt
Baking soda serves as the leavening agent in this recipe, helping the cookies rise and achieve the perfect texture. It reacts with the acidic components of the brown sugar and the egg, creating carbon dioxide bubbles that lighten the dough. Meanwhile, a pinch of salt is essential for balancing the sweetness of the sugars and enhancing the overall flavor. Together, these ingredients play a crucial role in achieving the ideal cookie consistency.
Chocolate Chips
No chocolate peanut butter cookie would be complete without chocolate chips, which add an extra layer of indulgence to the final product. Semi-sweet chocolate chips are the perfect choice for this recipe, providing a rich and slightly sweet contrast to the peanut butter. As the cookies bake, the chocolate chips melt slightly, creating gooey pockets of chocolate that beautifully complement the nutty flavor of the peanut butter.
Coconut Oil
While coconut oil is an optional ingredient, it can be used when melting chocolate for the thumbprint. Adding a little coconut oil can help create a smoother chocolate consistency, making it easier to fill the thumbprint indentations. Additionally, coconut oil has a light, pleasant flavor that can subtly enhance the overall taste of the cookies, making them even more enjoyable.
Granulated Sugar for Rolling
Before baking, the cookie dough is rolled into balls and coated in granulated sugar. This not only adds a touch of sweetness but also creates a lovely texture on the surface of the cookies. The sugar coating caramelizes slightly during baking, adding a delightful crunch that contrasts with the soft interior of the cookie.
Step-by-Step Instructions for Success
Baking chocolate peanut butter thumbprint cookies is a straightforward process, and with the right guidance, you’ll be able to create a batch that’s nothing short of spectacular. Below, we break down each step to ensure clarity and success in the kitchen.
Preheating the Oven
The first step in baking any cookie is preheating the oven. Set your oven to 350°F (175°C) to ensure that it reaches the optimal temperature for baking. Preheating is essential, as it allows for even cooking and the proper rise of the cookies. If you skip this step, you risk uneven baking, which can lead to cookies that are either too soft or burnt.
Mixing the Ingredients
Once the oven is preheated, gather your ingredients and start mixing. In a large mixing bowl, combine the creamy peanut butter, granulated sugar, and brown sugar. Using a hand mixer or a stand mixer fitted with a paddle attachment, beat these ingredients together until they are well blended and creamy. This process is crucial, as it incorporates air into the mixture, helping to create a light texture.
Next, add the egg and vanilla extract to the bowl. Continue mixing until the egg is fully incorporated and the mixture appears smooth. At this stage, you should have a rich, creamy base that is well combined and ready for the dry ingredients.
Incorporating Dry Ingredients
In a separate bowl, whisk together the all-purpose flour, baking soda, and salt. This step is important for evenly distributing the baking soda and salt throughout the flour, ensuring that each cookie bakes consistently. Gradually add the dry mixture to the wet ingredients, mixing on low speed until just combined. Be careful not to overmix, as this can lead to tough cookies. The dough should be soft and slightly sticky but still hold its shape.
Shaping the Cookies
With your dough ready, it’s time to shape the cookies. Using a cookie scoop or your hands, portion out equal amounts of dough and roll them into balls, approximately one inch in diameter. It’s important to aim for uniformity in size to ensure even baking. Once you’ve formed the balls, roll each one in granulated sugar to create a sweet, sparkling exterior.
Arrange the sugar-coated dough balls on a lined baking sheet, leaving enough space between each ball, as they will spread during baking. This spacing is crucial; if they are too close together, they may merge into one another and lose their distinct shape.
Creating the Thumbprint
The final step in preparing the cookies is creating the iconic thumbprint indentation. To do this, gently press your thumb into the center of each dough ball, making a deep enough indentation to hold the chocolate filling without compromising the cookie’s structure. If you find that the dough sticks to your thumb, you can lightly dust it with flour or use the back of a measuring spoon to create the indentations.
With your thumbprints created, the cookies are now ready to be baked. Following these steps will set you on the path to baking delicious chocolate peanut butter thumbprint cookies that are sure to delight anyone who takes a bite.
Stay tuned for the next part of this article, where we will guide you through the baking process and provide tips for achieving the best results.

Baking Time and Temperature
When it comes to baking Chocolate Peanut Butter Thumbprint Cookies, achieving the perfect texture is crucial. The baking time for these cookies typically ranges from 10 to 12 minutes at a temperature of 350°F (175°C). However, knowing exactly when your cookies are done requires keen observation.
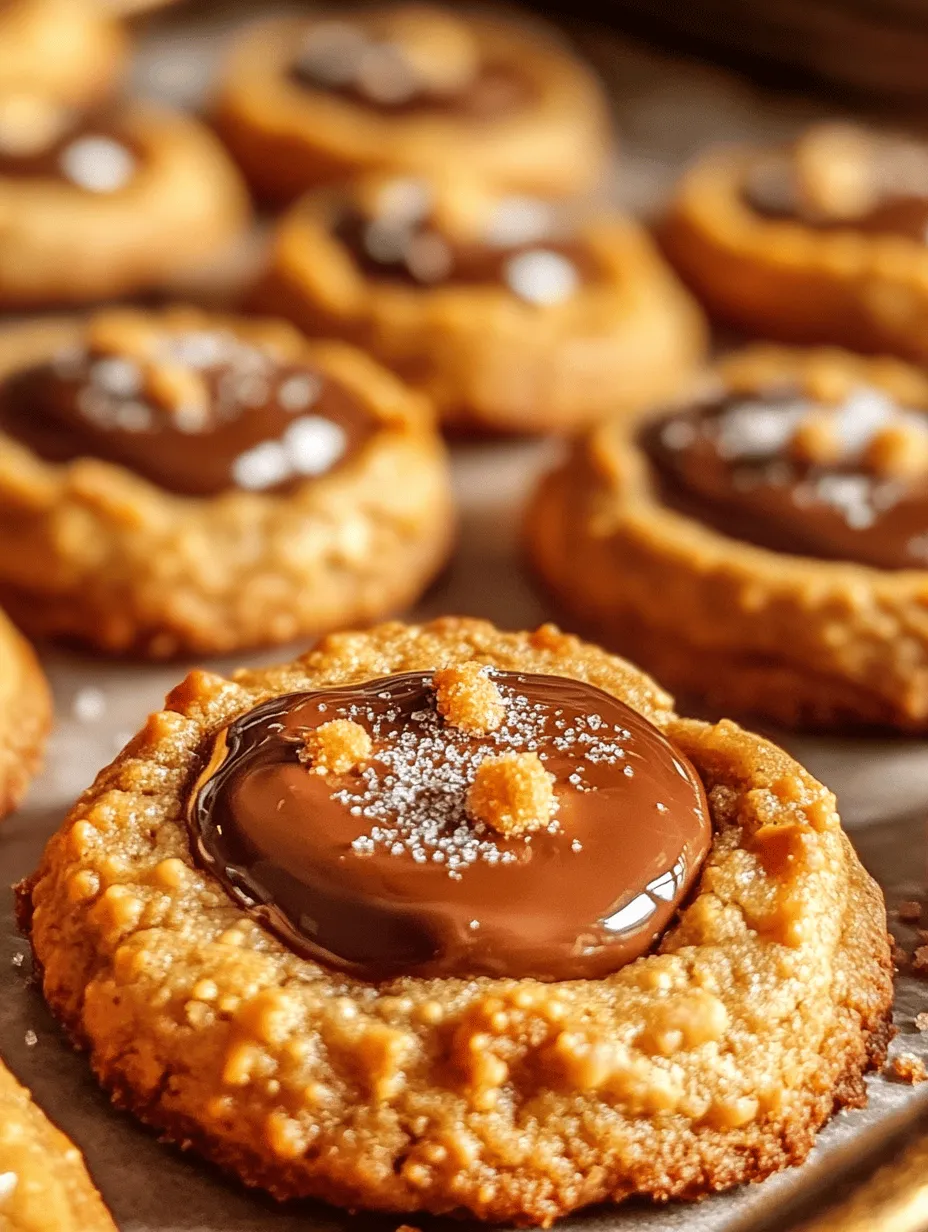
Visual Cues: The cookies should be lightly golden around the edges while still appearing soft in the center. They may appear a bit puffy when they first come out of the oven, but they will settle as they cool. A good rule of thumb is to remove them from the oven just when the edges start to firm up, as the residual heat will continue to cook them slightly while they cool.
Melting the Chocolate
Melting chocolate for your thumbprint cookies can be done safely and effectively using a few different methods. The key is to avoid overheating, which can lead to a grainy texture.
Best Practices:
1. Double Boiler Method: Place a heatproof bowl over simmering water, ensuring the bowl doesn’t touch the water. Add your chocolate and stir gently until melted and smooth.
2. Microwave Method: If using a microwave, place chopped chocolate in a microwave-safe bowl. Heat in short bursts of 20-30 seconds, stirring in between until fully melted. This method requires careful attention to avoid burning the chocolate.
3. Avoid Water Contact: Ensure that no water gets into the chocolate, as even a drop can cause it to seize.
Filling the Thumbprints
Filling the thumbprint cookies is where the fun really begins! Once your cookies have cooled slightly after baking, it’s time to add the chocolate filling.
How to Fill:
1. Make an indentation in the center of each cookie using your thumb or the back of a teaspoon. Be sure to press down gently but firmly, creating a well deep enough to hold the filling without breaking the cookie.
2. When filling the thumbprints, use a piping bag or a small spoon to add melted chocolate into each indentation. Aim for a generous amount, but avoid overfilling. A well-filled thumbprint should look inviting but not overflow. This ensures that the chocolate doesn’t run off the sides, maintaining the cookie’s aesthetic appeal.
Cooling Process
Allowing your cookies to cool is a critical step in ensuring that they set properly. After filling the thumbprints, let the cookies cool on a wire rack for at least 15-20 minutes.
Why Cooling is Essential:
Cooling lets the chocolate solidify, creating a beautiful contrast against the soft, chewy cookie. If you attempt to move the cookies too soon, the chocolate can smear, and the cookies may fall apart. Patience is key here; giving them adequate time to cool will enhance both texture and flavor.
Baking Tips for Perfect Thumbprint Cookies
Creating the ideal Chocolate Peanut Butter Thumbprint Cookies requires attention to detail. Here are some expert baking tips to help you avoid common pitfalls:
Cookie Texture
The texture of your cookies can vary based on a few factors.
– Chewy Cookies: To achieve a chewy texture, ensure that you do not overbake the cookies. Removing them from the oven while still soft is essential. Additionally, using brown sugar instead of white sugar can add moisture and create a chewier consistency.
– Crisp Cookies: If you prefer a crispier cookie, allow them to bake a minute or two longer. You can also use a higher ratio of white sugar to brown sugar, as white sugar leads to a crisper texture.
Adjusting Sweetness
Sweetness is subjective, and you can easily adjust the sugar levels in your recipe.
– Reduce Sugar: If you want a less sweet cookie, consider cutting the sugar by 25%. This alteration can enhance the flavor of the peanut butter and chocolate.
– Natural Sweeteners: You can also experiment with natural sweeteners like honey or maple syrup, but keep in mind that this may alter the texture.
Chocolate Variations
While semi-sweet chocolate is a classic choice for filling your thumbprints, don’t be afraid to get creative!
– Dark Chocolate: For a richer, more intense flavor, use dark chocolate. This will provide a nice contrast to the sweetness of the cookie.
– White Chocolate: If you prefer a sweeter, creamier filling, white chocolate can be a delightful alternative. You can even add a touch of vanilla extract to enhance the flavor.
Storage Recommendations
To maintain the freshness of your Chocolate Peanut Butter Thumbprint Cookies, proper storage is essential.
– Room Temperature: Store the cookies in an airtight container at room temperature. They will stay fresh for up to one week. Layering them between parchment paper can help prevent them from sticking together.
– Freezing: For longer storage, these cookies freeze quite well. Place them in a single layer in an airtight container or freezer bag, separating layers with parchment paper. They can be frozen for up to three months. When ready to enjoy, simply thaw them at room temperature.
Serving Suggestions and Pairing Ideas
Presenting your cookies beautifully can elevate the enjoyment of your delicious treats. Here are some creative serving suggestions:
Presentation Suggestions
– Plating for Gatherings: Arrange your cookies on a decorative platter, perhaps with a few sprigs of mint or edible flowers for color. You can also dust them with powdered sugar for an elegant touch.
– Gifting: If you’re giving these cookies as a gift, consider placing them in a clear cellophane bag tied with a ribbon. A handwritten note or a label with the recipe can add a personal touch.
Beverage Pairings
Pairing your thumbprint cookies with the right beverage can enhance the overall flavor experience.
– Milk: A classic pairing, milk complements the richness of peanut butter and chocolate.
– Coffee: For an adult twist, serve your cookies with a cup of coffee. The bitterness of coffee contrasts beautifully with the sweetness of the cookies.
– Tea: A warm cup of tea, such as chai or Earl Grey, can also provide a lovely balance to the flavors.
Nutritional Information
While enjoying your Chocolate Peanut Butter Thumbprint Cookies, it’s helpful to be mindful of their nutritional content.
Caloric Breakdown
On average, each cookie contains approximately 100-120 calories, depending on the size and specific ingredients used. This makes them a delightful yet indulgent treat that can be enjoyed in moderation.
Ingredient Benefits
Key ingredients in this recipe also offer nutritional benefits:
– Peanut Butter: Rich in protein and healthy fats, peanut butter provides sustenance and can help keep you feeling full. It’s also a source of vitamins and minerals like vitamin E, magnesium, and potassium.
– Whole Wheat Flour: If you opt for whole wheat flour, you’ll add extra fiber to your cookies, which can aid in digestion and contribute to overall health.
Conclusion
Baking Chocolate Peanut Butter Thumbprint Cookies is not just about creating a delicious dessert; it’s an experience filled with joy and creativity. The delightful combination of flavors and textures in these cookies makes them a perfect treat for any occasion. As you embark on this baking journey, embrace the process, enjoy the aroma that fills your kitchen, and relish the satisfaction of sharing your homemade cookies with family and friends.
Whether you’re celebrating a special moment or simply indulging your sweet tooth, these thumbprint cookies are sure to impress. So roll up your sleeves, gather your ingredients, and get ready to create a batch of these delightful cookies that will leave everyone asking for more. Happy baking!
