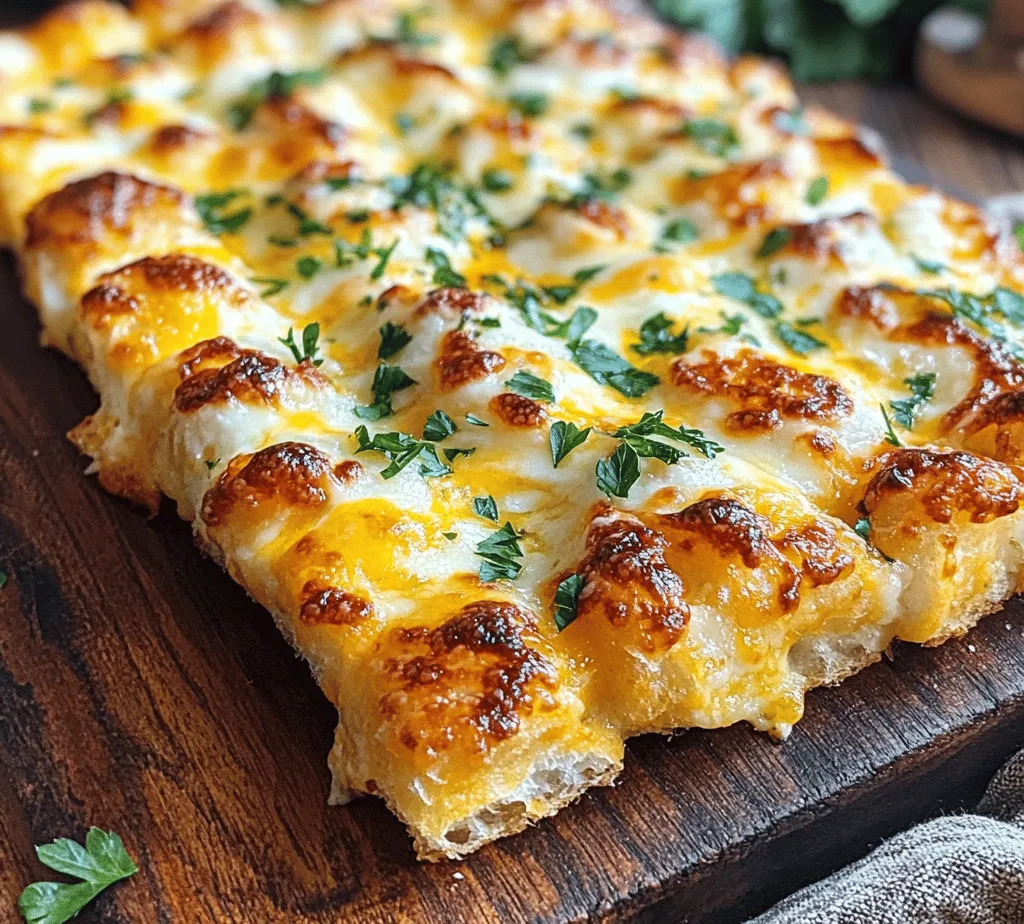
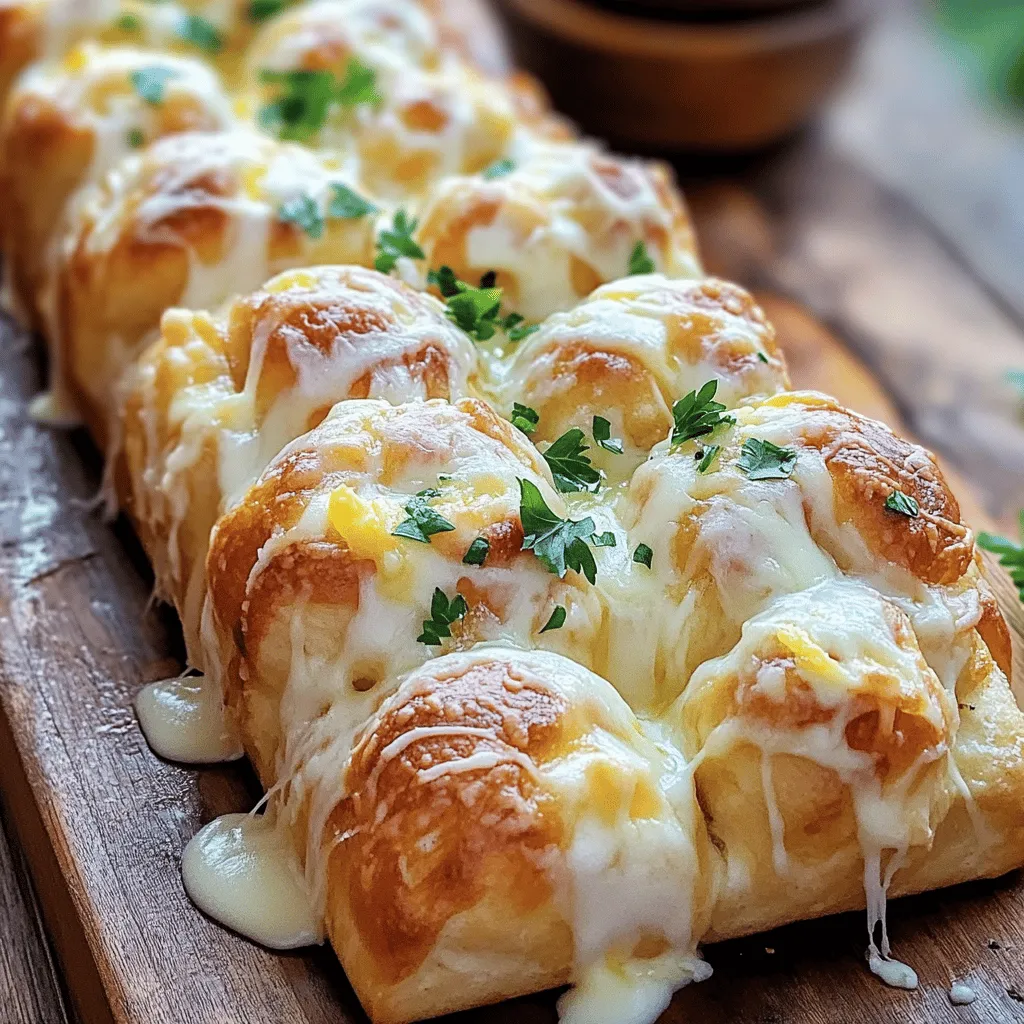
Homemade breadsticks are a cherished staple in many households, often serving as a delightful accompaniment to meals or a satisfying snack on their own. Among the plethora of options available, Cheesy Garlic Bliss Breadsticks stand out as a mouthwatering treat that marries simplicity with robust flavor. Imagine sinking your teeth into warm, buttery breadsticks infused with the savory aroma of garlic and the rich creaminess of melted cheese. This recipe encapsulates the joy of baking, transforming your kitchen into a cozy haven filled with irresistible scents and warmth. Whether you serve them alongside pasta, soups, or as a standalone appetizer, these breadsticks will elevate any dining experience, making them a must-try for both novice and experienced bakers alike.
The process of making breadsticks from scratch is not only rewarding but also allows you to customize flavors to suit your taste. With minimal ingredients and straightforward steps, you can create a batch of these Cheesy Garlic Bliss Breadsticks that will impress your family and friends. As you embark on this culinary adventure, you will discover that the joy of baking lies not just in the final product but also in the process itself—the kneading of the dough, the anticipation of the rising yeast, and the excitement of pulling a tray of golden, cheesy goodness from the oven.
Understanding the Ingredients
To achieve the perfect Cheesy Garlic Bliss Breadsticks, understanding the role of each ingredient is essential. Below, we explore the key components that come together to create these delectable treats.
All-Purpose Flour
All-purpose flour serves as the foundation for the breadstick dough. Its versatility makes it an ideal choice for many baking projects, offering a balanced protein content that provides structure and chewiness to the breadsticks. When combined with water and yeast, the flour forms gluten, which traps air bubbles produced during fermentation, resulting in a light and airy texture.
Active Dry Yeast
Active dry yeast is a crucial ingredient for breadmaking, responsible for fermentation and the leavening process. When activated with warm water, the yeast begins to consume sugar, producing carbon dioxide gas that helps the dough rise. This step is vital for achieving the fluffy texture that distinguishes these breadsticks. It’s important to ensure that the water temperature is just right—too hot and you risk killing the yeast; too cold and it won’t activate adequately.
Warm Water
Temperature plays a significant role in the success of any yeast-based recipe, and warm water is essential for activating the active dry yeast. The ideal temperature for activating yeast is between 100°F and 110°F (37°C to 43°C). At this range, the yeast can thrive, producing the necessary gases for dough expansion. Using a kitchen thermometer can help ensure accuracy, but a simple test is to dip your finger into the water; it should feel comfortably warm, not hot.
Sugar
Sugar is more than just a sweetener in this recipe; it plays a critical role in yeast activation. When combined with warm water, sugar nourishes the yeast, encouraging it to multiply and produce carbon dioxide. Additionally, sugar contributes to the browning of the breadsticks during baking, giving them a gorgeous golden hue and enhancing their overall flavor.
Salt
Salt is a key ingredient that enhances the flavor of breadsticks while also strengthening the dough. It regulates yeast activity, ensuring that fermentation occurs at the right pace. Too much salt can inhibit yeast growth, while too little can lead to overly rapid fermentation. A balanced amount of salt not only improves taste but also helps create a tender yet chewy texture.
Olive Oil
Incorporating olive oil into the dough adds richness and moisture, resulting in a softer texture. The fat in the olive oil coats the flour proteins and helps to create a tender crumb. Additionally, olive oil contributes a subtle flavor that complements the other ingredients beautifully, enhancing the overall profile of the breadsticks.
Garlic Powder
Garlic powder is a fundamental component in the Cheesy Garlic Bliss Breadsticks, providing a robust and aromatic flavor. It infuses the breadsticks with that signature garlicky essence that pairs so well with cheese. The convenience of garlic powder allows for easy incorporation into the dough, ensuring that every bite is packed with flavor.
Italian Seasoning
A blend of dried herbs, Italian seasoning adds depth and complexity to the flavor profile of the breadsticks. Typically composed of oregano, basil, thyme, and rosemary, this seasoning mix brings a Mediterranean flair to the recipe, enhancing the overall taste and making these breadsticks a delightful addition to any Italian meal.
Mozzarella and Parmesan Cheese
What would cheesy garlic breadsticks be without cheese? Mozzarella and Parmesan cheese are the stars of this recipe, providing gooeyness and savory flavor. Mozzarella melts beautifully, creating that stretchiness we all love, while Parmesan adds a sharp, tangy note that elevates the overall flavor. Together, they create a harmonious blend that makes these breadsticks truly irresistible.
Fresh Parsley
As a finishing touch, fresh parsley adds a burst of color and a hint of freshness. Chopped finely and sprinkled on top of the baked breadsticks, parsley not only enhances the presentation but also contributes a subtle herbaceous flavor that balances the richness of the cheese and garlic.
Step-by-Step Instructions
Now that we have a solid understanding of the ingredients, it’s time to dive into the step-by-step process of making Cheesy Garlic Bliss Breadsticks. Follow these detailed instructions to ensure your breadsticks turn out perfectly every time.
Activating the Yeast
The first step in making your Cheesy Garlic Bliss Breadsticks is to activate the yeast. In a small bowl, combine warm water and sugar, stirring until the sugar is dissolved. Sprinkle the active dry yeast over the surface of the water and let it sit for about 5 to 10 minutes. During this time, you should see the yeast begin to froth and bubble, indicating that it is active and ready to use. This step is crucial, as it sets the foundation for a well-risen dough.
Mixing the Dough
Once the yeast is activated, transfer it to a large mixing bowl. Add the all-purpose flour, salt, olive oil, garlic powder, and Italian seasoning to the bowl. Using a wooden spoon or a dough whisk, mix the ingredients until they come together to form a shaggy dough. The dough should be slightly sticky but manageable. If it feels too wet, you can add a little more flour, one tablespoon at a time, until you achieve the desired consistency.
Kneading the Dough
Kneading is a vital process that develops the gluten in the dough, giving the breadsticks their chewy texture. Transfer the dough onto a lightly floured surface and begin kneading it by folding it over itself and pushing it down with the palms of your hands. Rotate the dough a quarter turn after each fold to ensure even kneading. Continue kneading for about 8 to 10 minutes, until the dough is smooth and elastic. To test for readiness, perform the “windowpane test”: stretch a small piece of dough between your fingers. If it stretches without tearing and you can see light through it, your dough is ready for the next step.
By following these initial steps carefully, you’ll be well on your way to creating delicious Cheesy Garlic Bliss Breadsticks that are sure to become a household favorite. Stay tuned for the next part of this recipe, where we will explore the remaining steps, including shaping, baking, and the final touches that will make these breadsticks truly shine.

First Rise
The first rise is a critical step in the bread-making process, as it allows the yeast to ferment and produce carbon dioxide, which in turn helps the dough to rise. For optimal dough rising, find a warm, draft-free environment. An ideal temperature for yeast activation is between 75°F and 85°F (24°C to 29°C). If your kitchen is cool, you can create a cozy environment by turning your oven on to the lowest setting for a few minutes, then turning it off and placing the dough inside with the door slightly ajar.
To know when your dough is ready, look for it to double in size, which typically takes about one hour. You can check this by gently pressing your finger into the dough; if the indentation remains, your dough has risen sufficiently. If it springs back, give it a bit more time.
Preheating the Oven
Preheating your oven is a vital step that ensures even baking and helps achieve the perfect texture for your Cheesy Garlic Bliss Breadsticks. Set your oven to 375°F (190°C) shortly before your dough is ready for baking. This allows the oven to reach the optimal temperature, ensuring that the breadsticks begin cooking uniformly as soon as they are placed inside. Skipping this step could result in uneven cooking and a less-than-ideal texture.
Shaping the Breadsticks
Once the dough has risen, it’s time to shape the breadsticks. Start by gently punching down the risen dough to release any trapped air bubbles. Transfer the dough to a lightly floured surface and divide it into equal portions, aiming for pieces that are about 1 inch wide. Use a rolling pin or your hands to stretch each piece into a rope-like shape, about 6-8 inches long. For even sizes, consider using a scale to weigh each piece, ensuring uniformity for consistent baking.
Adding Toppings
Achieving the perfect cheese-to-dough ratio is essential for maximizing flavor in your breadsticks. After shaping, place the sticks on a greased baking sheet, spacing them about 2 inches apart. It’s time to sprinkle the shredded cheese generously on top. A mix of mozzarella and parmesan yields a delightful result, providing both melty goodness and a savory kick. Be sure to add some minced garlic and a dash of Italian herbs before the second rise to enhance the flavor profile.
Second Rise
The second rise is crucial for achieving fluffy breadsticks. After adding your toppings, cover the breadsticks with a clean kitchen towel and allow them to rise for an additional 30 minutes. This rest period gives the dough another chance to develop its structure and flavor. When the breadsticks have puffed up slightly, you’ll know they are ready to go into the oven.
Baking
Now that your breadsticks have risen a second time, it’s time to bake. Carefully place the baking sheet in your preheated oven and bake for 15-20 minutes. The breadsticks are done when they are golden brown and the cheese is bubbly and slightly crispy. To check for doneness, look for a deep golden hue and give one of the breadsticks a gentle tap; it should sound hollow. Additionally, if you have a kitchen thermometer, the internal temperature should reach around 190°F (88°C).
Garnishing
Once out of the oven, let your breadsticks cool slightly before garnishing. For an extra touch of flavor, brush them with melted butter mixed with minced garlic and chopped parsley. This not only enhances the aroma but also adds a beautiful sheen to your breadsticks, making them even more appetizing. Serve warm for maximum enjoyment.
Baking Tips for Success
To ensure the best outcome when making Cheesy Garlic Bliss Breadsticks, consider the following expert insights:
– Yeast Troubleshooting: If your breadsticks do not rise, check the expiration date on your yeast. If it’s too old, it may not activate properly. Always proof your yeast in warm water with a bit of sugar; if it bubbles, it’s alive!
– Dough Consistency: Humidity can affect how much flour you need. If your dough feels too sticky, add flour gradually until it is smooth and elastic. Conversely, if it’s too dry, a small amount of water can balance it out.
– Baking Sheet Preparation: Greasing the baking sheet is essential to prevent sticking. Alternatively, you can line it with parchment paper for easy cleanup. Ensure the breadsticks are spaced adequately to allow for expansion during baking.
– Achieving the Perfect Golden Brown: Pay close attention to visual cues. A golden-brown color on the tops and a slight crispness along the edges indicate that your breadsticks are perfectly baked.
Serving Suggestions
Cheesy Garlic Bliss Breadsticks are incredibly versatile and can be enjoyed in various ways:
– Pairing with Dips: These breadsticks are perfect for dipping! Consider serving them with marinara sauce for a classic Italian experience. Garlic butter is another excellent option to highlight the flavors, or ranch dressing for those who enjoy a creamy accompaniment.
– Serving with Meals: These breadsticks complement a variety of meals beautifully. Serve them alongside pasta dishes, such as spaghetti and meatballs, creamy Alfredo, or even a bowl of hearty soup or salad for a satisfying meal.
– Creative Variations: Get creative with your breadsticks by customizing them with different cheeses such as cheddar or gouda. Adding fresh herbs like rosemary or thyme can elevate the flavors, or even experimenting with spices like red pepper flakes for a bit of heat.
Conclusion
Creating homemade Cheesy Garlic Bliss Breadsticks is not just about the delicious end product; it’s also about the joy of baking and sharing good food with loved ones. This recipe encapsulates warmth, comfort, and satisfaction, making it a perfect addition to your culinary repertoire. The combination of fluffy, cheesy breadsticks with a hint of garlic is bound to impress, whether served as an appetizer, side dish, or snack.
As you embark on your baking journey, embrace the experience, and remember that each step is part of a delightful process. These breadsticks are not just food; they are a way to connect, share, and enjoy the simple pleasures of home-cooked meals. So gather your ingredients, roll up your sleeves, and let the aroma of freshly baked breadsticks fill your kitchen. Happy baking!


