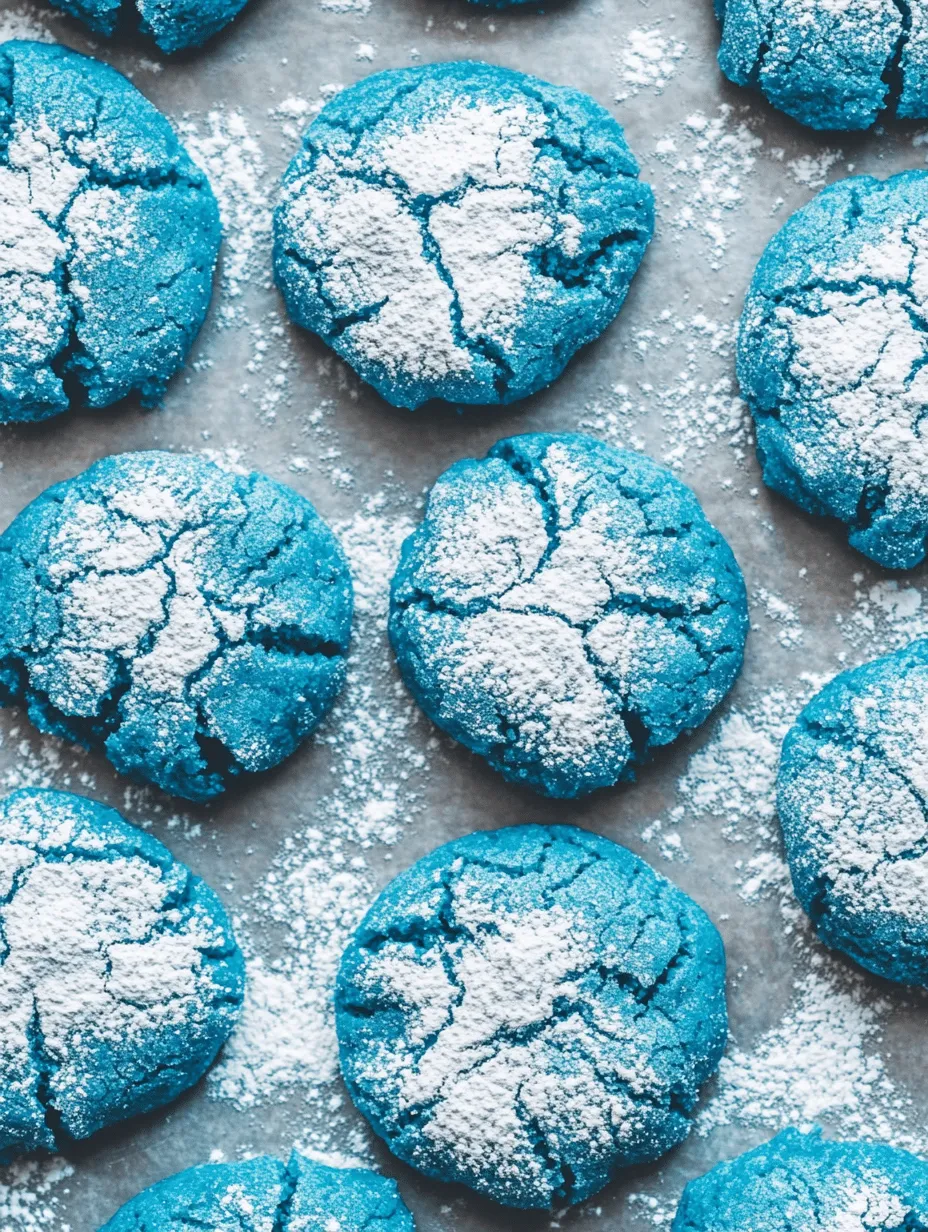
When it comes to baking, few things delight the eye quite like a batch of Blue Crinkle Cookies. Their charming, crinkled surface and vibrant blue hue make them an instant showstopper at any gathering, whether you’re hosting a birthday party, a baby shower, or simply indulging in a sweet treat at home. What truly sets these cookies apart is not just their striking appearance but also their unique flavor profile that balances sweetness and richness perfectly. These cookies embody the joyful spirit of baking, inviting you to unleash your creativity and enjoy the whimsical nature of dessert-making.
The importance of color and presentation in desserts cannot be overstated. Colorful treats have a magical way of elevating any occasion, adding a sense of fun and festivity. Blue Crinkle Cookies, with their captivating azure shade, are not just a feast for the taste buds but also for the eyes. As you watch them bake in the oven, you’ll see the transformation from a smooth dough to a beautifully crinkled surface, creating a visual masterpiece that will surely impress your guests.
Baking is often a celebration of creativity, and these cookies provide an excellent canvas for your artistic flair. The process of mixing, rolling, and decorating these delightful treats can brighten anyone’s day, making it an enjoyable activity to share with family or friends. Whether you’re a seasoned baker or a novice, the Blue Crinkle Cookies recipe offers an exciting opportunity to explore the whimsical nature of baking, ensuring that you and your loved ones will relish in every bite.
Understanding the Ingredients
Before diving into the preparation steps, it’s essential to understand the role of each ingredient in creating the perfect Blue Crinkle Cookies. The right mix of components is crucial for achieving the desired texture and flavor, and knowing how they work together can help you become a more confident baker.
Key Ingredients Overview
1. All-purpose Flour: This is the backbone of our cookie dough, providing structure and stability. The proteins in the flour develop gluten as you mix, which gives the cookies their chewy texture.
2. Cocoa Powder: While these cookies are predominantly blue, cocoa powder adds a rich, chocolatey depth that balances the sweetness. It also contributes to the overall color contrast, enhancing the visual appeal of the final product.
3. Sugars: In this recipe, we use both granulated and brown sugar. Granulated sugar contributes to the cookie’s crispness, while brown sugar adds moisture and a chewy texture due to its molasses content. This combination ensures that each bite is flavorful and satisfying.
4. Vegetable Oil: Unlike butter, which is solid at room temperature, vegetable oil is liquid and helps create a softer, more tender cookie. It adds moisture, preventing the cookies from becoming dry and crumbly.
5. Eggs: Eggs play a crucial role in binding the ingredients together while also providing leavening. They create a light and airy texture, allowing the cookies to rise as they bake.
6. Vanilla Extract: A staple in many dessert recipes, vanilla extract enhances the overall flavor profile of the cookies. It adds a warm, inviting aroma that complements the sweetness of the sugars.
7. Food Coloring: To achieve that stunning blue hue, food coloring is a must. Gel food coloring is often recommended for its vibrancy and ease of use, allowing you to achieve the perfect shade without altering the texture of the dough.
Understanding how these ingredients interact will not only help you create delicious Blue Crinkle Cookies but also empower you to experiment with other flavors and colors in your baking endeavors.
Preparation Steps Explained
Now that we’ve covered the essential ingredients, let’s walk through the preparation steps that will lead you to a delightful batch of Blue Crinkle Cookies. Each step is designed to ensure that your cookies turn out perfectly every time.
Step 1: Preheating the Oven
Before you begin mixing your ingredients, it’s crucial to preheat your oven to 350°F (175°C). This step is essential as it sets the stage for even baking. A properly preheated oven ensures that your cookies will start baking immediately, allowing them to rise and develop that characteristic crinkled surface. If the oven isn’t hot enough, the cookies may spread too much, leading to flat, less appealing results.
Step 2: Mixing Dry Ingredients
In a medium mixing bowl, combine your all-purpose flour, cocoa powder, baking powder, and a pinch of salt. Whisking these dry ingredients together is vital for creating a uniform mixture. Proper whisking helps to aerate the flour, ensuring that your cookies have a light texture. Moreover, it evenly distributes the cocoa powder and leavening agents, preventing any clumps that could affect the final texture of your cookies.
Step 3: Combining Sugars with Oil
In a separate large bowl, mix the granulated sugar and brown sugar with the vegetable oil until well combined. This mixture should be smooth and slightly glossy. The sugars will dissolve into the oil, creating a syrupy texture that acts as the wet base for your cookie dough. The sugars not only sweeten the cookies but also contribute to their moisture content, so take your time to ensure they are well blended.
Step 4: Incorporating Eggs and Vanilla
Next, add the eggs and vanilla extract to the sugar-oil mixture. Beat the mixture until it is smooth and creamy, ensuring that the eggs are fully incorporated. This step adds richness and flavor to the cookies, as well as helps in leavening. The mixture should become lighter in color as you mix, which is an indication of proper aeration.
Step 5: Adding Food Coloring
To achieve that vibrant blue color, add gel food coloring to the egg and sugar mixture. Start with a small amount and mix thoroughly. You can always add more until you reach your desired shade. Using gel food coloring is recommended as it provides a more intense color without adding excess liquid to the dough. Ensure that the color is evenly distributed throughout the mixture for consistent results.
With these initial steps completed, you are well on your way to creating a batch of Blue Crinkle Cookies that not only taste incredible but also look stunning. In the following sections, we will delve deeper into the remaining preparation steps and provide tips for achieving the best results. Stay tuned for an exciting journey into the world of baking these delightful cookies!

Chilling the dough is a crucial step in making Blue Crinkle Cookies. Not only does it enhance the handling of the dough, but it also plays a significant role in achieving the desired texture. When you chill the dough, the fats solidify, which helps prevent the cookies from spreading too much during baking. This results in thick, chewy cookies with the iconic crinkle appearance. Moreover, chilling allows the flavors to meld, leading to a more delicious final product.
Shaping and Baking the Cookies
Techniques for Rolling Cookie Dough into Balls
Once the dough has chilled, it’s time to shape your cookies. Start by using a cookie scoop or a tablespoon to portion out the dough. Take a piece of dough and roll it between your palms to form a ball. The key is to make the balls uniform in size to ensure even baking across the batch. Aim for about 1 inch in diameter; this size will yield cookies that are both thick and soft.
The Process of Rolling in Powdered Sugar and Its Visual Appeal
After shaping the dough into balls, the next step is to roll each ball in powdered sugar. This not only adds a delightful sweetness but also creates the distinctive crinkle effect as the cookies bake. To do this, generously coat each ball in powdered sugar, ensuring they are well covered. This sugar coating will crack and provide that signature look when the cookies rise in the oven, revealing the blue hue beneath.
Optimal Spacing on the Baking Sheet for Even Baking
When placing the dough balls on the baking sheet, it’s important to leave enough space between each one. A spacing of about 2 inches apart is ideal. This allows the cookies to spread without merging into one another during baking. Using parchment paper or a silicone baking mat can also help prevent sticking and ensure even baking.
Baking Time and Temperature: Signs to Look for to Avoid Overbaking
Preheat your oven to 350°F (175°C). Bake the cookies for about 10-12 minutes, but keep a close eye on them. The cookies are done when the edges are set, and the centers are just slightly underbaked. They will continue to firm up as they cool. Avoid the temptation to leave them in the oven too long, as overbaking can result in a dry texture. Trust your instincts and rely on visual cues: a light golden edge and a soft center are the perfect signs of readiness.
The Cooling Process: Why It’s Crucial for Texture Retention
After removing the cookies from the oven, let them cool on the baking sheet for about 5 minutes. This cooling time allows the cookies to firm up slightly before transferring them to a wire rack. Cooling on the baking sheet also helps maintain moisture, ensuring a chewy texture. Once they are set enough to handle, carefully transfer the cookies to the wire rack to cool completely, allowing air to circulate around them.
Serving Suggestions
Creative Ideas for Presenting Blue Crinkle Cookies
Presentation can elevate the experience of enjoying Blue Crinkle Cookies. Consider stacking them on a decorative platter or placing them in a clear jar tied with a ribbon for an eye-catching display. You can also dust the tops with additional powdered sugar just before serving for an extra touch of elegance. For a festive occasion, arranging them on a tiered cake stand can create a stunning centerpiece.
Pairing Options: Beverages That Complement The Cookies
To enhance the enjoyment of your Blue Crinkle Cookies, consider pairing them with beverages that complement their flavor. A glass of cold milk is a classic choice, as the creamy texture balances the sweetness of the cookies. For a more sophisticated pairing, try serving them with a cup of herbal tea or a light coffee. The warm notes of tea or coffee can highlight the flavors of the cookies while providing a delightful contrast to their sweetness.
Suggestions for Occasions Where These Cookies Would Shine
Blue Crinkle Cookies are perfect for a variety of occasions. Their vibrant color makes them an excellent choice for birthday parties, baby showers, or gender reveal celebrations. They also fit seamlessly into holiday festivities, especially when you want to add a pop of color to your dessert table. Whether you’re hosting a casual get-together or a more formal event, these cookies can easily steal the show.
Nutritional Information
Breakdown of Key Nutritional Components per Cookie
Understanding the nutritional content of your Blue Crinkle Cookies can help you enjoy them responsibly. On average, each cookie contains approximately 120 calories, with 5 grams of fat, 18 grams of carbohydrates, and 1 gram of protein. The cookies are also a source of sugar, with about 10 grams per serving, contributing to their sweet and delightful flavor.
Discussion on Possible Substitutions for Dietary Restrictions
If you or your guests have dietary restrictions, there are several substitutions you can make to accommodate different needs. For a gluten-free version, substitute all-purpose flour with a 1:1 gluten-free flour blend. If you prefer a vegan recipe, you can replace the eggs with flaxseed meal or applesauce, and use a plant-based butter substitute. These modifications can help you create a version of Blue Crinkle Cookies that everyone can enjoy, ensuring no one misses out on the fun.
Conclusion
The allure of Blue Crinkle Cookies lies not only in their stunning appearance but also in the joy they bring to the baking process. Making these cookies can be a delightful creative outlet, allowing you to experiment with colors and flavors. Whether you’re preparing them for a special occasion or simply indulging in a sweet treat at home, they are sure to please anyone who takes a bite.
As you embark on your baking journey, remember that experimenting with different colors, flavors, and even toppings can elevate your cookie-making game. The kitchen is a place of creativity and expression, and each batch of cookies you bake is an opportunity to share joy with friends and family. Embrace the process, enjoy the results, and savor the happiness that comes from both baking and sharing your delicious creations.


