Introduction
Are you ready to take your appetizer game to the next level? Look no further than bacon jalapeño popper cheese balls, a culinary delight that combines a perfect trifecta of creamy cheese, spicy jalapeños, and crispy bacon. These irresistible bites have captured the hearts (and taste buds) of food enthusiasts everywhere, making them a popular choice for parties, family gatherings, and even cozy nights in. Whether you’re hosting a game day experience or simply craving a snack, these cheese balls are sure to be a crowd-pleaser.
The appeal of bacon jalapeño popper cheese balls lies in their versatility. They can serve as a mouthwatering appetizer, a delightful snack during movie marathons, or even a fun addition to a potluck spread. Each bite offers a satisfying crunch followed by a burst of cheesy goodness and a hint of heat, providing a comforting and enjoyable experience. The best part? They are incredibly easy to make at home, promising a fresh and flavorful treat that’s far superior to anything you might find in a store.
The Allure of Bacon Jalapeño Popper Cheese Balls
To truly appreciate bacon jalapeño popper cheese balls, it’s essential to understand their roots. Jalapeño poppers, the inspiration behind this recipe, are a beloved appetizer that originated in the American Southwest. Traditionally, jalapeños are halved, stuffed with a creamy cheese mixture, and either deep-fried or baked. Over time, these spicy bites have evolved into numerous variations, integrating different cheeses, crusts, and fillings to cater to diverse palates.
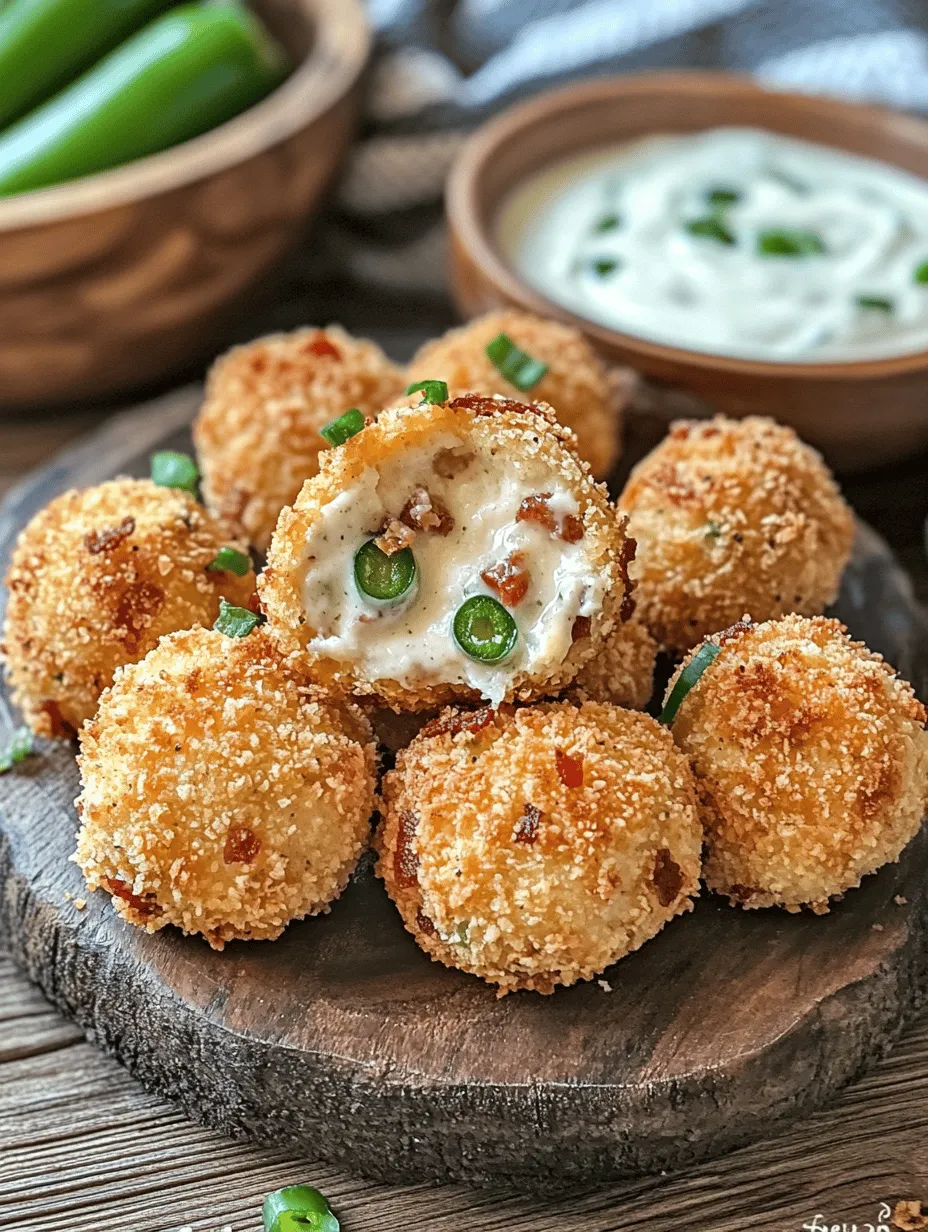
Bacon jalapeño popper cheese balls are a creative twist on this classic dish. They take the beloved flavors of jalapeño poppers and transform them into bite-sized balls, perfect for sharing. The combination of smooth cream cheese, gooey cheddar and mozzarella, and smoky bacon creates an explosion of flavors that dance on the palate. The heat from the jalapeños adds a delightful kick, which can be adjusted according to your spice tolerance, making these cheese balls suitable for everyone, from the mild-mannered to the spice aficionados.
The process of making cheese balls allows for an exciting interplay of textures—crispy on the outside and creamy on the inside. This delightful contrast, combined with the satisfying crunch of the coating, makes each bite an experience worth savoring. Whether you’re enjoying them warm out of the oven or at room temperature, these cheese balls are sure to impress.
Ingredients Breakdown
To create the perfect bacon jalapeño popper cheese balls, it’s crucial to utilize high-quality ingredients. Here’s a closer look at what you’ll need and how each component contributes to the final dish:
– Cream Cheese: Serving as the foundation of the cheese filling, cream cheese adds richness and a smooth texture. Its creamy nature helps bind the other ingredients together, creating a luscious base that melts beautifully when baked.
– Cheddar and Mozzarella: A blend of shredded cheddar and mozzarella offers a delightful combination of flavors and textures. Cheddar adds a sharp and tangy note, while mozzarella brings a stretchy, gooey quality that makes these cheese balls even more indulgent.
– Bacon: The star of the show! Crispy, smoky bacon not only enhances the flavor profile but also adds a satisfying crunch. The saltiness of the bacon perfectly balances the creamy cheese and spicy jalapeños, creating a harmonious blend of taste.
– Jalapeños: These vibrant green peppers provide the signature heat that makes jalapeño poppers so beloved. Depending on your preference, you can adjust the amount of jalapeño used, ensuring that the spice level is just right for you and your guests. For those who prefer a milder flavor, opting for roasted or pickled jalapeños can add a different dimension without overwhelming heat.
– Seasonings: To elevate the overall flavor, a mix of garlic powder, onion powder, and smoked paprika is essential. These seasonings add depth and a subtle smokiness that complements the other ingredients perfectly.
– Coating: The coating is crucial for achieving that desired crispy exterior. A combination of flour, eggs, and breadcrumbs creates a crunchy shell that contrasts beautifully with the creamy filling. This textural element enhances the overall appeal of the cheese balls, making them even more enjoyable to eat.
Step-by-Step Instructions
Now that we’ve discussed the ingredients, let’s dive into the step-by-step process of creating these delicious bacon jalapeño popper cheese balls. Follow along carefully to ensure your cheese balls turn out perfectly every time.
Mixing the Cheese Filling
1. Preparation: Begin by softening your cream cheese. Leave it at room temperature for about 30 minutes before mixing, or microwave it for about 10-15 seconds to soften. This will make it easier to blend with the other ingredients.
2. Combining Ingredients: In a large mixing bowl, add the softened cream cheese, shredded cheddar, and mozzarella. Use a spatula or a hand mixer to combine these ingredients thoroughly until they form a smooth and cohesive mixture.
3. Incorporating Bacon and Jalapeños: Next, fold in the crumbled crispy bacon and finely chopped jalapeños. Make sure to mix these in evenly to distribute the flavors throughout the cheese mixture. At this stage, you can also add the garlic powder, onion powder, and smoked paprika. Taste the mixture and adjust seasoning if necessary, adding more jalapeños for heat or bacon for smokiness.
Shaping the Balls
1. Chilling the Mixture: Once the cheese filling is well combined, cover the bowl with plastic wrap and refrigerate it for about 30 minutes. Chilling the mixture will make it easier to handle and help the cheese balls maintain their shape during cooking.
2. Forming Uniform Balls: After chilling, use a small cookie scoop or your hands to portion out the mixture. Aim for balls that are about 1 inch in diameter for even cooking. Shape them gently but firmly, ensuring they hold together well.
3. Coating the Cheese Balls: Prepare a breading station by setting up three shallow dishes: one with flour, another with beaten eggs, and the last with breadcrumbs. Roll each cheese ball in flour, coating it evenly. Dip it into the beaten eggs, allowing any excess to drip off, and finally, roll it in the breadcrumbs, ensuring a thorough coating. This step is crucial for achieving that golden-brown crunch when baked or fried.
With the cheese balls shaped and coated, you’re well on your way to creating a delicious appetizer that’s sure to impress. The combination of flavors and textures in these bacon jalapeño popper cheese balls is nothing short of delightful. Stay tuned for the next part, where we’ll explore the cooking methods and additional tips for ensuring your cheese balls turn out perfectly crispy and flavorful every time.

Preparing the Dredging Station
Creating a well-organized dredging station is essential for ensuring a smooth and efficient workflow when preparing bacon jalapeño popper cheese balls. A typical dredging station consists of three main components: flour, egg wash, and breadcrumbs.
1. Flour: Start with all-purpose flour in a shallow dish. This will be the first layer of coating that helps the egg wash adhere to the cheese balls. To elevate the flavor, consider seasoning the flour with a pinch of salt, pepper, and even a dash of garlic powder.
2. Egg Wash: In a separate bowl, whisk together eggs and a little bit of water or milk until fully combined. The egg wash acts as the binding agent that will hold the breadcrumbs in place, creating that crispy outer layer.
3. Breadcrumbs: Use panko breadcrumbs in another shallow dish for an extra crunch. Panko offers a lighter and airier texture compared to regular breadcrumbs, making it ideal for frying. If you want to add some spice, consider mixing in some crushed red pepper flakes or seasoning the breadcrumbs with smoked paprika.
Workflow Tips:
– Arrange the dishes in an assembly line: flour first, then egg wash, and finally breadcrumbs. This setup will help you move quickly and minimize the mess.
– Keep one hand dry and the other wet while coating the cheese balls to avoid clumping. Use your dry hand to handle the cheese balls and your wet hand for dipping into the egg wash and breadcrumbs.
Coating the Cheese Balls
To achieve the perfect coating for your bacon jalapeño popper cheese balls, follow these steps carefully:
1. Forming the Balls: Once your cheese mixture has chilled, scoop out about a tablespoon of the mixture and roll it into a ball using your hands. Make sure they are uniform in size for even cooking.
2. Dredging Process:
– Roll each cheese ball in the seasoned flour, ensuring it is fully coated. Shake off any excess.
– Dip the floured cheese ball into the egg wash, letting the excess drip off.
– Finally, roll the cheese ball in the panko breadcrumbs, making sure it is completely covered. Press gently to ensure the breadcrumbs adhere well.
3. Resting: After coating all the cheese balls, place them on a baking sheet lined with parchment paper. This resting time helps the coating set and reduces the chances of it falling off during frying.
Heating the Oil
The key to frying perfect cheese balls is to maintain the right oil temperature. A common mistake is to either fry at too low or too high a temperature.
1. Choosing the Right Oil: Use an oil with a high smoke point, such as vegetable oil, canola oil, or peanut oil. These oils can withstand high temperatures without burning.
2. Heating Technique: Pour enough oil into a deep frying pan or pot to submerge the cheese balls completely. Heat the oil over medium-high heat.
3. Testing the Temperature: Use a thermometer to check that the oil reaches 350°F to 375°F (175°C to 190°C). If you don’t have a thermometer, drop a small piece of bread into the oil; if it sizzles and browns in about 60 seconds, the oil is ready for frying.
Frying the Cheese Balls
Frying the cheese balls requires attention to ensure they cook evenly and achieve that golden-brown crust.
1. Batch Cooking: Don’t overcrowd the pan; fry in batches. This allows the temperature of the oil to stay consistent and ensures even cooking. Aim to fry about 4 to 6 cheese balls at a time, depending on the size of your frying vessel.
2. Frying Technique: Carefully lower each cheese ball into the hot oil using a slotted spoon. Fry for about 3 to 4 minutes or until they are golden brown, turning them occasionally to ensure even browning.
3. Draining: Once cooked, remove the cheese balls from the oil and place them on a plate lined with paper towels to absorb excess oil. This will help keep them crispy and prevent them from becoming greasy.
Serving Suggestions
Bacon jalapeño popper cheese balls are best served hot and fresh out of the fryer. Here are some creative serving suggestions to elevate your dish:
1. Dipping Sauces: Offer a variety of sauces for dipping, such as ranch dressing, spicy mayo, or a tangy barbecue sauce. A creamy avocado dip or a zesty cilantro-lime crema can also enhance the flavor profile.
2. Presentation: Arrange the cheese balls on a large platter or a wooden board. Garnish with fresh herbs like chopped cilantro or parsley for a pop of color. You can also drizzle some sauce over the cheese balls for an appealing look.
3. Accompaniments: Serve with fresh vegetable sticks, such as celery or carrot sticks, for crunch, or alongside nachos and salsa for a festive appetizer spread.
Nutritional Information
When enjoying bacon jalapeño popper cheese balls, it’s important to be aware of their nutritional profile. Here is a breakdown per serving (approximately 3 cheese balls):
– Calories: 250
– Protein: 10g
– Carbohydrates: 20g
– Fat: 15g
– Saturated Fat: 5g
– Cholesterol: 50mg
– Sodium: 400mg
Dietary Considerations:
– For those watching their caloric intake, consider baking instead of frying, which can significantly reduce the fat content.
– If you have dietary restrictions, you can experiment with gluten-free breadcrumbs and low-fat cheese options to make this recipe more suitable for your needs.
Variations and Customizations
One of the best aspects of bacon jalapeño popper cheese balls is their versatility. Here are some variations and customizations you can try:
1. Different Cheeses: While cream cheese is a classic choice, feel free to mix it up. Pepper jack cheese adds a spicy kick, while gouda can bring a smoky flavor that pairs wonderfully with the bacon and jalapeño.
2. Adding Vegetables: Enhance the texture and flavor by incorporating other ingredients. Finely chopped corn or bell peppers can add sweetness and crunch, while spinach can provide a nutritious boost.
3. Baking vs. Frying: For a lighter option, consider baking your cheese balls. Preheat the oven to 375°F (190°C), place the coated cheese balls on a greased baking sheet, and bake for 15-20 minutes or until golden brown. While the texture may differ slightly, you can still achieve a delicious result without the extra oil.
Pairing Suggestions
To create a well-rounded appetizer spread for gatherings, consider these pairing suggestions:
1. Beverages: Cheese balls pair well with a variety of drinks. For a casual setting, serve with cold beers, particularly IPAs or lagers. If you prefer non-alcoholic options, a sparkling water with lime or a zesty lemonade can cleanse the palate.
2. Sides: Complement the cheese balls with sides like a fresh salad, guacamole, or salsa. These fresh elements can balance the richness of the cheese balls and enhance the overall experience.
The Perfect Occasion for Bacon Jalapeño Popper Cheese Balls
Bacon jalapeño popper cheese balls are an excellent choice for various occasions:
1. Game Day: These cheese balls make a fantastic addition to your game day spread, appealing to fans of all ages. Their bold flavors and satisfying crunch will keep everyone coming back for more.
2. Family Gatherings: Whether for holidays, birthdays, or casual family get-togethers, these cheese balls will impress guests and provide a delicious finger food option.
3. Casual Get-Togethers: Hosting friends for a movie night or a casual dinner? Bacon jalapeño popper cheese balls can elevate your appetizer game and spark conversations.
Conclusion
Bacon jalapeño popper cheese balls are a delightful blend of flavors and textures that cater to a wide range of taste preferences. Their versatility allows for creative variations, and they are sure to be a hit at any gathering. Whether you decide to fry or bake, serve with dips, or pair with your favorite beverages, these cheese balls are a testament to the joy of cooking and sharing delicious food with loved ones. So gather your ingredients, roll up your sleeves, and enjoy bringing this mouthwatering treat to life in your kitchen.


