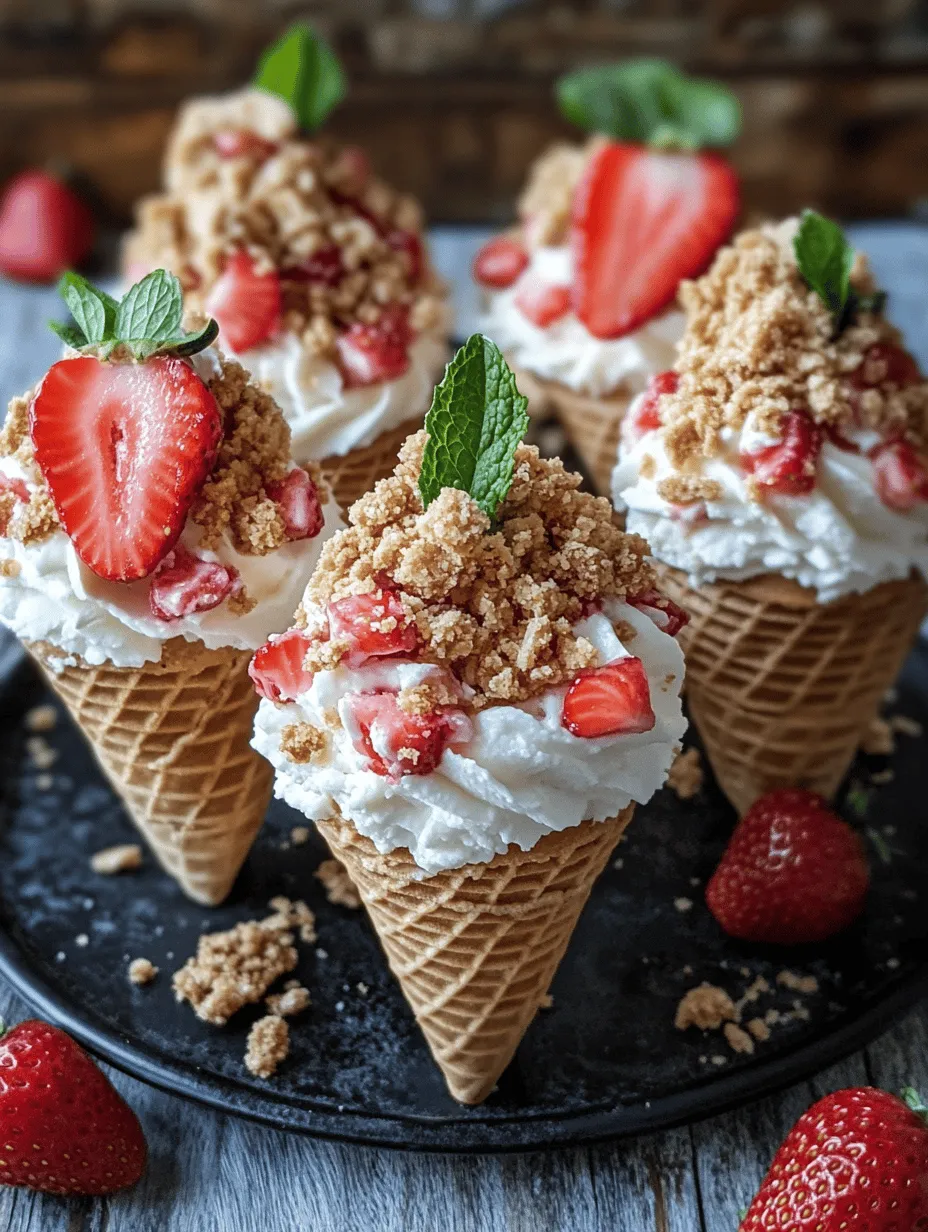
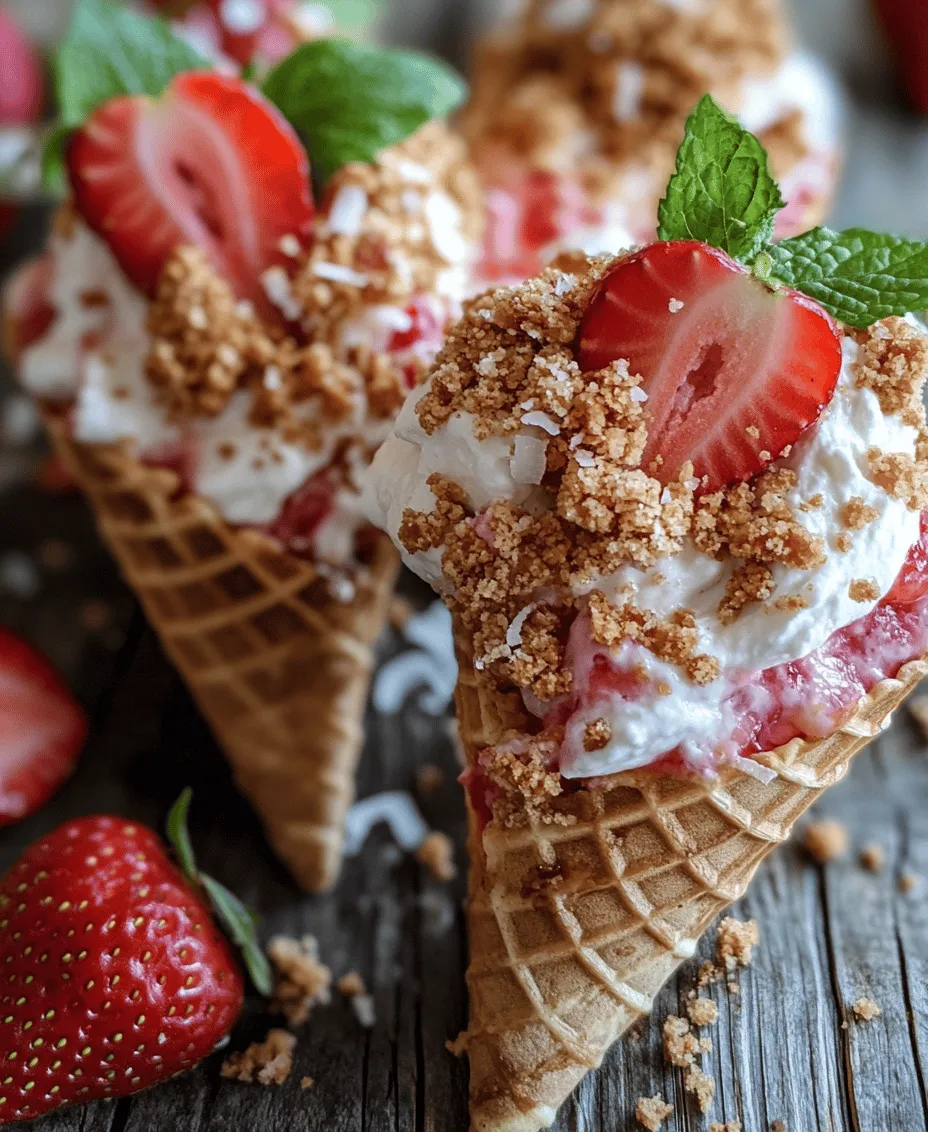
Cheesecake has long been a crowd-pleaser, celebrated for its rich, creamy texture and versatility in flavor. From classic New York-style to fruity variations, this beloved dessert has evolved through the years, leading to innovative presentations that captivate both the eyes and the palate. One such imaginative twist is the Strawberry Crunch Cheesecake Cone, a delightful combination of flavors and textures that promises to elevate your dessert game this summer.
These cheesecake cones are not only easy to make but also visually stunning, making them the perfect treat for summer gatherings, picnics, or simply to enjoy at home. The Strawberry Crunch Cheesecake Cone brings a refreshing burst of strawberry flavor, complemented by a crunchy topping and a creamy filling that feels like a scoop of indulgence in every bite. With a combination of fresh ingredients and simple steps, you’ll be able to impress your friends and family with this delightful dessert.
Understanding the Ingredients
To create the perfect Strawberry Crunch Cheesecake Cones, it’s essential to focus on the quality and balance of the ingredients used. Each component plays a crucial role in achieving the ideal texture and flavor profile that sets these cones apart.
Graham Cracker Crumbs
Graham cracker crumbs form the base of the crunchy topping and are fundamental in providing that quintessential cheesecake flavor and texture. The subtle sweetness and hint of cinnamon from the graham crackers create a familiar flavor that pairs beautifully with the creamy filling. When mixed with melted butter and sugar, the crumbs achieve a delightful crunch that enhances the overall experience of the cone.
Shredded Coconut
Incorporating shredded coconut into the topping adds a tropical flair and an extra layer of crunch. The coconut brings a slightly chewy texture that complements the crispness of the graham crackers while also infusing the dessert with a hint of natural sweetness. This ingredient not only enhances the visual appeal of the cones but also contributes to a more complex flavor profile that transports you to a sun-soaked beach with every bite.
Cream Cheese
At the heart of this cheesecake cone is the cream cheese, which is essential for achieving that signature creamy texture synonymous with cheesecake. When properly beaten, cream cheese transforms into a luscious base that serves as the foundation for the filling. Its rich, tangy flavor balances perfectly with the sweetness of the other ingredients, resulting in a filling that is indulgent yet refreshing.
Heavy Whipping Cream
Heavy whipping cream is the secret ingredient that adds lightness and fluffiness to the cheesecake filling. By whipping the cream to stiff peaks, you introduce air into the mixture, creating a light and airy texture that contrasts beautifully with the crunch of the topping. The cream also enhances the overall richness of the filling, making each cone feel like a decadent treat.
Fresh Strawberries
No Strawberry Crunch Cheesecake Cone would be complete without the star ingredient: fresh strawberries. Their vibrant color and natural sweetness provide a fresh, fruity element that balances the richness of the cream cheese filling. Chopped and folded into the mixture, strawberries contribute bursts of flavor that brighten each bite, making them the perfect complement to the creamy texture and crunchy topping.
When crafting these cones, using high-quality ingredients is paramount. Fresh, ripe strawberries will elevate the flavor, while premium cream cheese and organic graham crackers can enhance the overall taste and texture of the dessert. Investing in quality ingredients ensures that your Strawberry Crunch Cheesecake Cones will be a memorable treat that everyone will love.
Step-by-Step Preparation of Strawberry Crunch Cheesecake Cones
Once you have gathered all your ingredients, it’s time to dive into the preparation of these delightful Strawberry Crunch Cheesecake Cones. The process is straightforward and can be broken down into several key steps that will guide you through creating this delicious dessert.
Preparation of the Crunch Topping
The first step in creating your Strawberry Crunch Cheesecake Cones is preparing the crunchy topping. This crunchy layer is key to achieving the perfect balance of textures, and it’s a simple task that requires only a few ingredients.
1. Combine the Ingredients: In a mixing bowl, combine one cup of graham cracker crumbs, one cup of shredded coconut, and a quarter cup of granulated sugar. The sugar will enhance the sweetness of the topping, contributing to the overall flavor of the cones.
2. Add Melted Butter: Melt half a cup of unsalted butter and pour it over the dry mixture. The melted butter serves as a binding agent, helping to hold the crumbs and coconut together while adding richness to the topping.
3. Mix Thoroughly: Using a fork or your hands, mix the ingredients until they are well combined. The mixture should resemble wet sand and should hold together when pressed. If it feels too dry, add a little more melted butter until you achieve the right consistency.
4. Bake for Texture: Preheat your oven to 350°F (175°C) and spread the mixture evenly on a baking sheet lined with parchment paper. Bake for about 10-12 minutes, stirring halfway through, until the topping is golden brown and fragrant. Allow it to cool completely before using it to top the cheesecake cones.
Achieving the right texture for the crunch topping is crucial. You want it to be crispy while still being able to hold its shape when layered on top of the cheesecake filling. Baking it enhances the flavors and gives it a delightful crunch that contrasts beautifully with the creamy filling.
Making the Cheesecake Filling
With the crunchy topping prepared, it’s time to whip up the creamy cheesecake filling. The filling is where the magic happens, and it’s essential to follow these steps for the best results.
1. Beat the Cream Cheese: In a large mixing bowl, start by making sure your cream cheese is at room temperature. This will make it easier to beat into a smooth consistency. Use an electric mixer to beat the cream cheese until smooth and creamy, which should take about 2-3 minutes.
2. Incorporate Sugar and Vanilla: Gradually add in three-quarters of a cup of powdered sugar and one teaspoon of vanilla extract. The powdered sugar will sweeten the cream cheese while the vanilla adds depth and flavor. Continue beating the mixture until fully combined and smooth.
3. Whip the Heavy Cream: In a separate bowl, pour in one cup of heavy whipping cream. Using a clean electric mixer, whip the cream until stiff peaks form. This means that when you lift the beaters, the cream holds its shape and does not collapse. Be careful not to overwhip, as it can turn grainy.
4. Fold the Whipped Cream: Gently fold the whipped cream into the cream cheese mixture. Use a spatula and a gentle lifting motion to combine the two mixtures without deflating the whipped cream. This technique is crucial for maintaining the light and airy texture of the filling.
Incorporating Strawberries
Finally, it’s time to add the fresh strawberries, which will transform your cheesecake filling into a flavorful delight.
1. Prepare the Strawberries: Wash and hull about one cup of fresh strawberries. Slice them into small pieces, making sure to reserve a few for garnish if desired.
2. Fold in the Strawberries: Gently fold the chopped strawberries into the cheesecake filling, ensuring they are evenly distributed throughout the mixture. The strawberries will add pops of color and flavor, making your cheesecake cones even more appealing.
Now that your crunch topping and cheesecake filling are prepared, you’re ready to assemble your Strawberry Crunch Cheesecake Cones. The combination of textures—from the crunchy topping to the creamy filling and the fresh strawberries—creates an unforgettable dessert that is sure to impress. Stay tuned for the next part, where we’ll cover the final assembly and presentation of these delightful cones!
How to Fold Strawberries into the Mixture
Incorporating fresh strawberries into your cheesecake mixture is a delightful way to infuse your dessert with fruity flavor. To achieve the best results, it’s important to fold the strawberries in gently, preserving their beautiful shape and texture. Start by washing and hulling your strawberries, then slice them into small pieces. After preparing your cheesecake filling, add the strawberry pieces to the mixture.
To fold the strawberries without compromising the texture of your cheesecake, use a spatula. Begin by adding a small amount of the strawberry pieces to the cheesecake mixture. Instead of stirring vigorously, which can break down the strawberries and create a mushy texture, gently lift and fold the mixture over the strawberries. Rotate your bowl as you fold, ensuring even distribution without overmixing. This technique helps keep the strawberries intact while blending their flavor into the cheesecake.
Benefits of Using Fresh Strawberries Over Frozen Ones
When it comes to flavor and texture, fresh strawberries are a superior choice for this recipe. Fresh strawberries have a bright, juicy taste that enhances the overall flavor profile of the cheesecake cones. They also provide a satisfying crunch that complements the creamy cheesecake layer.
Frozen strawberries, while convenient, can often be mushy and lose some of their vibrant flavor during the freezing process. Additionally, they release excess moisture when thawed, which can lead to a soggy cheesecake filling. For the best results in your Strawberry Crunch Cheesecake Cones, opt for fresh strawberries whenever possible to elevate your dessert.
Assembling the Cheesecake Cones
Now that your cheesecake mixture is ready and your strawberries are folded in, it’s time to assemble your cones. Begin by gathering your waffle cones and the cheesecake filling. To fill the cones effectively, you have two main options: a piping bag or a spoon.
Using a Piping Bag:
1. Spoon the cheesecake mixture into a piping bag fitted with a large round tip. This method allows for a clean and precise filling.
2. Hold the cone at an angle and pipe the mixture into the cone, starting from the bottom and working your way up. This technique ensures that the filling reaches all the way down to the tip of the cone, preventing air pockets.
Using a Spoon:
1. If you don’t have a piping bag, a spoon works just as well. Simply scoop the cheesecake mixture into the cone.
2. Use the back of the spoon to gently push the filling down towards the bottom, ensuring it is well packed and that no air gaps remain.
For an aesthetically pleasing presentation, aim to fill the cones slightly above the rim and use a spatula to smooth the top. This not only looks great but also ensures that every bite is filled with that delicious cheesecake mixture.
Adding the Crunch Topping
The final touch to your Strawberry Crunch Cheesecake Cones is the crunch topping, which adds an exciting texture contrast to the creamy cheesecake. For the crunch topping, you can use a combination of crushed cookies or graham crackers mixed with melted butter.
Instructions for the Crunch Topping:
1. In a bowl, combine 1 cup of crushed cookies (such as graham crackers or vanilla wafers) with 4 tablespoons of melted butter. Mix well until the crumbs are evenly coated.
2. After filling your cones, dip the top of each cone into the crunch mixture, allowing it to stick to the cheesecake filling. For a thicker coating, you can gently roll the filled cone in the crunch topping to ensure an even layer.
The addition of this crunchy layer provides a delightful contrast to the creamy cheesecake and fresh strawberries, making each bite a harmonious blend of textures.
Chilling and Serving the Cones
Now that your Strawberry Crunch Cheesecake Cones are assembled, it’s essential to chill them before serving. Chilling allows the flavors to meld together and the cheesecake mixture to set properly, creating a more enjoyable eating experience.
Chilling Instructions:
1. Place the filled cones upright in a cup or cone holder to prevent them from tipping over.
2. Refrigerate the cones for at least 1-2 hours. This chilling time enhances the flavor and ensures that the cheesecake filling maintains its structure when bitten into.
When you’re ready to serve, consider garnishing the cones with fresh strawberries and a sprig of mint for a pop of color and added freshness. This simple presentation elevates the cones, making them perfect for any gathering or special occasion.
Nutritional Analysis of Strawberry Crunch Cheesecake Cones
Understanding the nutritional profile of your dessert can help you enjoy it guilt-free. Each Strawberry Crunch Cheesecake Cone offers a delightful balance of flavors and textures, alongside some nutritional benefits.
Key Ingredients and Their Benefits:
– Strawberries: Rich in vitamin C, antioxidants, and fiber, fresh strawberries contribute to overall wellness.
– Cream Cheese: Provides calcium and protein, making it a satisfying component of this dessert.
– Waffle Cones: While they add a crunchy texture, they are also a source of carbohydrates.
When considering portion control, it’s important to remember that these cones are rich and satisfying. Aim for one cone per serving to enjoy the treat without overindulging.
Variations and Customizations
While the Strawberry Crunch Cheesecake Cones are undeniably delicious on their own, there are plenty of ways to customize this recipe to suit your taste preferences.
Alternate Flavors:
– Chocolate: Swirl in cocoa powder into the cheesecake mixture for a chocolate variation. You can also use chocolate cookie crumbs for the crunch topping.
– Blueberry: Replace the strawberries with fresh blueberries for a different fruity twist. Fold them into the cheesecake mixture just like the strawberries for a burst of flavor.
Different Toppings:
– Experiment with various toppings such as crushed nuts, sprinkles, or coconut flakes for added texture and flavor. Drizzling melted chocolate or caramel sauce over the top can also enhance the visual appeal and taste.
Perfect Occasions for Serving
Strawberry Crunch Cheesecake Cones are a versatile dessert that fits perfectly into various occasions. Their portable nature makes them ideal for events where individual treats are preferred.
Ideal Occasions:
– Summer Parties: These cones are a refreshing treat for summer gatherings, providing a cool dessert option.
– Picnics: Their easy-to-handle format makes them perfect for outdoor events where mess-free desserts are essential.
– Birthday Celebrations: Serve them as a fun alternative to traditional birthday cake and let guests customize their cones with different toppings.
The appeal of serving individual desserts at gatherings lies in the ability to cater to different tastes. Guests can enjoy a personal touch with their own cones, adding toppings and garnishes as they please.
Conclusion
In conclusion, Strawberry Crunch Cheesecake Cones are an enjoyable and easy-to-make dessert that combines the sweetness of fresh strawberries with the creamy texture of cheesecake, all in a convenient waffle cone. The process of making these cones—from folding in the strawberries to assembling and chilling—highlights the joy of creating something beautiful and delicious.
We encourage you to try this recipe and experience the delightful combination of flavors and textures for yourself. Whether you’re serving them at a summer party, a picnic, or simply enjoying them at home, these cheesecake cones are sure to impress. Enjoy the satisfaction of making a dessert that not only looks stunning but tastes incredible as well.
