Introduction
There’s a certain magic that comes with the aroma of freshly baked pastries wafting through your kitchen, inviting everyone to gather around the table. Homemade pastries, with their flaky layers and rich fillings, have an irresistible allure that store-bought versions simply cannot replicate. Among these delightful treats, Cream Cheese Danishes stand out as a perfect amalgamation of buttery dough and luscious filling. This recipe elevates the classic Danish with a unique twist—adding sugared cranberries and a sweet butter glaze that will make your taste buds dance.
The combination of cream cheese, tart cranberries, and a glossy butter glaze creates a symphony of flavors that is both comforting and sophisticated. Whether you are hosting a brunch, celebrating a special occasion, or simply treating yourself to a well-deserved indulgence, these Cream Cheese Danishes are sure to impress. In this article, we aim to provide you with a straightforward, easy-to-follow recipe that will guide you through the process of baking these exquisite pastries, ensuring that even novice bakers can create a delicious masterpiece in their own kitchen.
Understanding Danish Pastry
Before diving into the recipe, it’s essential to appreciate the history and craftsmanship behind Danish pastries. Originating in Denmark, the Danish pastry has a rich heritage that dates back to the 19th century. It is believed that the pastry was inspired by Austrian bakers who introduced laminated dough techniques to Denmark. Over time, the Danes adapted this method, creating a uniquely flaky, buttery pastry that has become a staple in bakeries around the world.
A classic Danish pastry is characterized by its delicate layers, achieved through a technique known as lamination. This involves folding butter into the dough repeatedly to create thin layers that puff up beautifully when baked. The result is a light, airy texture that is perfect for holding a variety of fillings, from fruit preserves to rich cream cheese mixtures. Mastering the dough technique is key to crafting the perfect Danish, as it lays the foundation for the overall quality of the pastry.
Ingredients Breakdown
To create these delightful Cream Cheese Danishes with Sugared Cranberries and Butter Glaze, you will need a selection of essential ingredients. Each plays a crucial role in achieving the perfect balance of flavors and textures.
Ingredients List
– All-purpose flour: 4 cups (plus more for dusting)
– Granulated sugar: 1/4 cup (for the dough) + 1/2 cup (for the glaze)
– Active dry yeast: 2 1/4 teaspoons (1 packet)
– Milk: 1 cup (warm, about 110°F or 43°C)
– Salt: 1 teaspoon
– Unsalted butter: 1 cup (cold, for laminating) + 2 tablespoons (for the glaze)
– Eggs: 2 large (one for the dough and one for egg wash)
– Cream cheese: 8 ounces (softened)
– Fresh cranberries: 1 cup (for sugaring)
– Lemon zest: 1 teaspoon (for flavor enhancement)
– Vanilla extract: 1 teaspoon (for the cream cheese filling)
– Powdered sugar: 1 cup (for the glaze)
– Water: 1-2 tablespoons (to thin the glaze, if necessary)
Ingredient Functions
– Flour: The backbone of the dough, providing structure and stability.
– Granulated sugar: This adds sweetness to the dough and enhances the browning process during baking.
– Yeast: A key ingredient that introduces leavening, resulting in a light and fluffy texture.
– Cream cheese: The star of the filling, offering a rich, creamy texture that complements the tartness of the cranberries.
– Fresh cranberries: These bring a delightful burst of tartness and vibrant color, elevating the flavor profile of the danish.
– Butter glaze: A sweet finishing touch that adds gloss and additional flavor, making each bite irresistible.
Preparing the Dough
Now that you’re familiar with the ingredients, let’s dive into the process of preparing the dough. The dough for these Cream Cheese Danishes is a laminated dough, which means it requires a bit of technique and patience, but the results are well worth the effort.
Step 1: Proofing the Yeast
The first step in making any yeast-based dough is proofing the yeast. This process activates the yeast and ensures that it is alive and ready to leaven your dough.
1. In a small bowl, combine the warm milk (110°F or 43°C) and granulated sugar. Stir gently to dissolve the sugar.
2. Sprinkle the active dry yeast over the surface of the milk and let it sit for about 5-10 minutes. You should see bubbles forming on the surface, indicating that the yeast is active.
Step 2: Mixing Dry and Wet Ingredients
Once the yeast is proofed, it’s time to mix the dry and wet ingredients to form the dough.
1. In a large mixing bowl, combine the all-purpose flour and salt. Whisk together to ensure even distribution.
2. Create a well in the center of the flour mixture and pour in the proofed yeast mixture and one beaten egg.
3. Using a wooden spoon or spatula, stir the mixture until it starts to come together. The dough will be shaggy and slightly sticky.
Step 3: Kneading the Dough
Kneading is essential for developing gluten, which gives the dough its structure.
1. Transfer the dough onto a lightly floured surface.
2. Knead the dough for about 8-10 minutes until it becomes smooth and elastic. You’ll know it’s ready when it springs back slightly when pressed.
3. Form the kneaded dough into a ball and place it in a lightly greased bowl. Cover with plastic wrap or a clean kitchen towel.
Step 4: Rising Process
The rising process is critical for allowing the yeast to work its magic and for the dough to expand.
1. Place the covered bowl in a warm, draft-free area. A temperature between 75°F to 85°F (24°C to 29°C) is ideal.
2. Allow the dough to rise for about 1 hour, or until it has doubled in size.
Crafting the Cream Cheese Filling
While the dough is rising, you can prepare the cream cheese filling. This filling is what makes these danishes truly special, and it’s essential to get the texture and flavors just right.
Step 1: Preparing the Cream Cheese Filling
1. In a medium mixing bowl, add the softened cream cheese, granulated sugar, lemon zest, and vanilla extract.
2. Using an electric mixer or a whisk, beat the mixture until it is smooth and creamy. It’s important to start with softened cream cheese to avoid lumps and achieve a velvety texture.
Step 2: Balancing Flavors
1. Taste the filling and adjust the sweetness if necessary by adding a little more sugar. The lemon zest not only enhances the flavor but also adds a refreshing brightness that complements the creaminess of the cheese.
Step 3: Final Texture Check
1. Ensure that the cream cheese filling is smooth and well combined. If it seems too thick, you can add a splash of milk to achieve your desired consistency.
With the dough rising and the cream cheese filling prepared, you’re well on your way to creating these delicious Cream Cheese Danishes with Sugared Cranberries and Butter Glaze. Stay tuned for the next part, where we will guide you through the process of assembling and baking these delectable pastries.
Creating Sugared Cranberries
Sugared cranberries add a delightful pop of color and a sweet-tart flavor that elevates the Cream Cheese Danishes. To create these beautiful garnishes, follow these detailed steps:
1. Simmering the Cranberries: Start by preparing your cranberries. In a saucepan, combine 1 cup of fresh cranberries with 1 cup of water and 1 cup of granulated sugar. Bring this mixture to a gentle simmer over medium heat. Simmering is essential as it helps the cranberries soften slightly while absorbing sweetness from the sugar. Stir occasionally and let the mixture simmer for about 10 minutes until the cranberries begin to burst and the syrup forms.
2. Coating the Cranberries: After simmering, remove the cranberries from heat and let them cool in the syrup for about 30 minutes. This soaking time allows them to absorb more of the sugary goodness. Once cooled, use a slotted spoon to lift the cranberries from the syrup. Roll them in granulated sugar, ensuring they are fully coated. For best results, allow them to dry on a wire rack for at least an hour. This drying process will give the cranberries a beautiful sugar crust that will not only look appealing but also add a satisfying crunch when enjoying your danishes.
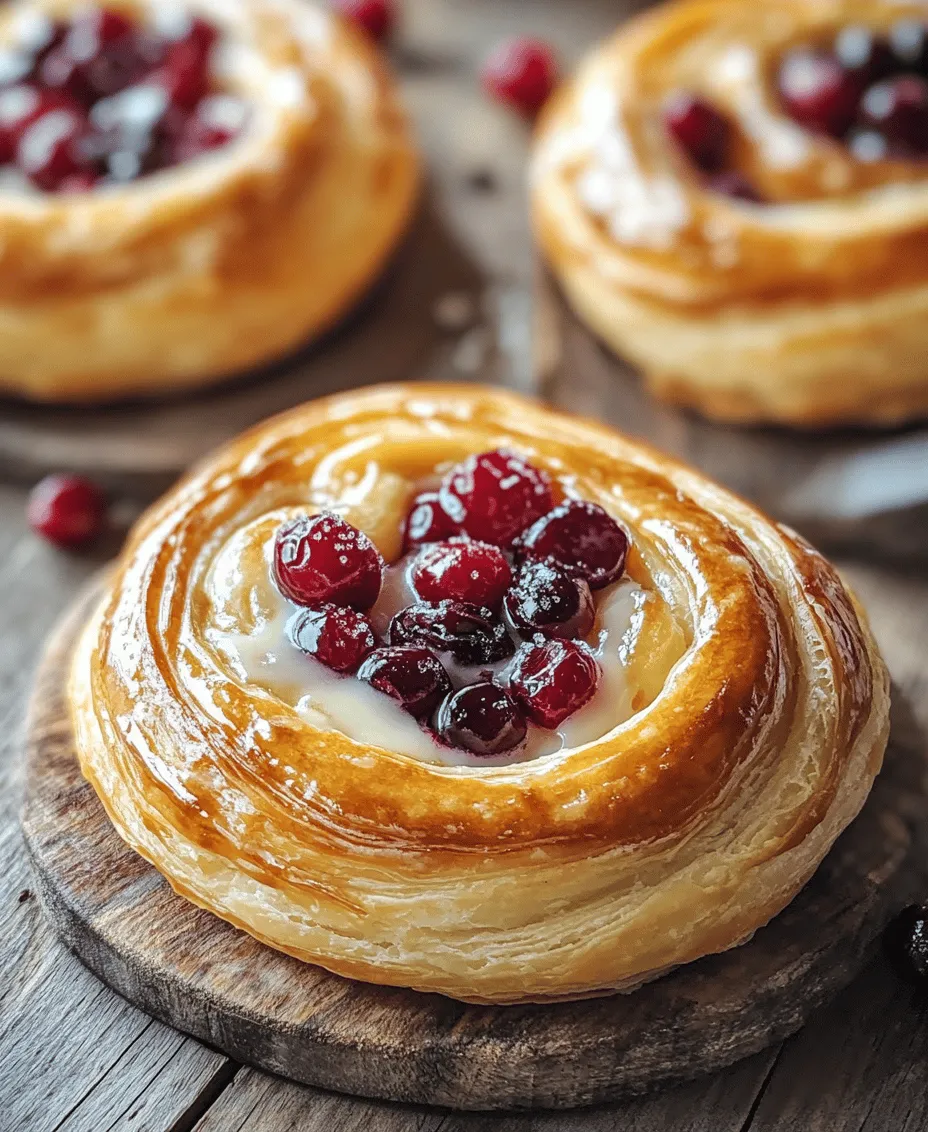
3. Uses of Sugared Cranberries: These sugared cranberries are not just a garnish; they can be used as a filling for the cream cheese mixture or sprinkled atop the assembled danishes before baking. Their tartness complements the sweet cream cheese filling, creating a balanced flavor profile. Additionally, sugared cranberries make for a stunning decorative touch on any pastry platter, perfect for festive gatherings or special occasions.
Assembling the Danishes
Once your dough and filling are ready, it’s time to assemble your Cream Cheese Danishes. Here’s a step-by-step guide to ensure they turn out perfectly:
1. Rolling Out the Dough: On a lightly floured surface, roll out your chilled dough into a rectangle that is about 1/4 inch thick. It’s important to achieve the ideal thickness, as this will ensure that the danishes rise beautifully during baking while maintaining a flaky texture.
2. Cutting and Shaping the Dough: After rolling out the dough, use a sharp knife or a pizza cutter to cut it into squares. Each square should measure roughly 4 inches by 4 inches. To create the signature frame of the danish, cut a smaller square in the center of each piece, leaving about 1 inch of dough around the edges. Be careful not to cut all the way through; you want to create a border that will hold the filling.
3. Filling and Folding: Place a generous spoonful of your cream cheese filling in the center of each square, then fold the corners of the dough towards the center, pinching the edges to secure the filling inside. Ensure that your filling stays in place during baking by avoiding overfilling. The corners should overlap slightly, creating a charming shape that will puff up beautifully in the oven.
Baking the Danishes
Baking is a critical step in achieving that perfect texture and golden color for your Cream Cheese Danishes. Follow these guidelines for optimal results:
1. Preheating the Oven: Preheat your oven to 375°F (190°C) at least 20 minutes before baking. Preheating is essential for even baking, ensuring that your pastries rise properly and develop a light, flaky texture.
2. Baking Time: Arrange the assembled danishes on a baking sheet lined with parchment paper, ensuring they have enough space to expand during baking. Bake in the preheated oven for 20-25 minutes or until the danishes are golden brown and puffed. Keep an eye on them during the last few minutes of baking to prevent over-browning.
3. Cooling Instructions: Once baked, remove the danishes from the oven and allow them to cool on the baking sheet for about 10 minutes. This cooling period helps maintain their shape and texture, preventing sogginess. After cooling slightly, transfer them to a wire rack to cool completely before drizzling with the glaze.
Preparing the Butter Glaze
The finishing touch for your Cream Cheese Danishes is a luscious butter glaze that enhances their appeal and flavor. Here’s how to prepare it:
1. Making the Butter Glaze: In a small saucepan, melt 1/4 cup of unsalted butter over low heat. Once melted, remove it from the heat and whisk in 1 cup of powdered sugar, followed by 2 tablespoons of milk and 1 teaspoon of vanilla extract. The vanilla will add depth to the glaze and complement the flavors of the danishes beautifully.
2. Achieving the Right Consistency: Whisk the mixture until it’s smooth and well combined. If the glaze is too thick, add a bit more milk, one teaspoon at a time, until you reach your desired drizzling consistency. If it’s too thin, add a little more powdered sugar to thicken it up.
3. Applying the Glaze: Once the danishes have cooled, use a spoon or a small whisk to drizzle the glaze over the top of each pastry. For maximum visual appeal, drizzle the glaze in a back-and-forth motion to create a beautiful pattern. Allow the glaze to set for a few minutes before serving.
Serving Suggestions
Now that your Cream Cheese Danishes are complete, here are some delightful ways to serve them:
1. Best Accompaniments: These danishes are perfect for breakfast or brunch. Pair them with a hot cup of coffee or tea to complement the rich flavors. A citrusy herbal tea can also enhance the overall experience, providing a refreshing balance to the sweetness.
2. Presentation Tips: When serving at gatherings or special occasions, arrange the danishes on a beautiful platter or cake stand. Garnish with a few sugared cranberries and sprigs of mint or rosemary for an attractive presentation. This not only adds visual interest but also hints at the delicious flavors to come.
3. Storing Leftovers: If you have any leftovers (though they are unlikely!), store the danishes in an airtight container at room temperature for up to two days. For longer storage, consider placing them in the refrigerator, but note that this may cause them to lose some of their flakiness. Reheat in the oven at a low temperature to restore their warmth and crispness before serving.
Conclusion
Baking Cream Cheese Danishes with Sugared Cranberries is a delightful experience that brings the warmth of homemade pastries into your kitchen. From the soft and flaky dough to the creamy filling and the festive touch of sugared cranberries, each bite is a celebration of flavor and texture. Whether you’re preparing these danishes for a special occasion or simply treating yourself and your loved ones, the satisfaction of creating something so delicious from scratch is truly rewarding.
We encourage you to try this recipe and enjoy the process of baking and sharing these delightful treats. There’s something inherently comforting about homemade pastries, especially when shared with friends and family. The joy of creating and enjoying food together is a cherished experience that brings warmth and connection. So, roll up your sleeves, gather your ingredients, and indulge in the delight of making and savoring Cream Cheese Danishes with Sugared Cranberries.